Most of the times, it is easy to tell when a noun is countable (ie. can be counted) and when it is uncountable. Think about the words “dog” and “sugar”. Easy, isn’t it?
We can say one dog, two dogs or a dog, ie, you can count “dogs”
But can you count “sugar”? Of course, you can’t. You can’t say one sugar, two sugarsor sugars, not even a sugar.
If only it were that easy! 🙂 Take for example vegetables and fruit. Vegetables are countable, but fruit is normally uncountable, though in some cases, to complicate things, it can be made plural when referring to different kinds of fruit.
The vast majority of commonly consumed fruits qualify as non-starchy. Would you like some fruit for dessert?
There you have it, this is English!
If you want to know more about countable and uncountable nouns, here, it is clearly explained.
On this post, I want to share with you two activities I did with my Upper-intermediate students in case you want to use them in your classes.
Game: Sit down. Stand Up
The first one is a very simple activity, perfect to use after a tedious lesson when you see attention is beginning to fade. Actually, it is not a game as there is no competition and nobody is eliminated but, to be honest, I don’t know how to call it. An energizer, perhaps? What is clear is that it will keep your students engaged and motivated.
I have used this activity with upper-intermediate students so the concept of countable or uncountable (mass) is not new to them.
Before the class: prepare a list of names that are clearly either countable or uncountable.
How to play:
Tell students you are going to call out nouns that can be classified as either countable or uncountable.
Tell them they will need to sit down if the noun is uncountable and stand up if it countable.
As you can see there are far more uncountable than countable nouns because my students already have a clear idea of what countable and uncountable means. If you are introducing this concept for the first time, I would suggest you use more or less the same number of countable and uncountable nouns.
The Quiz
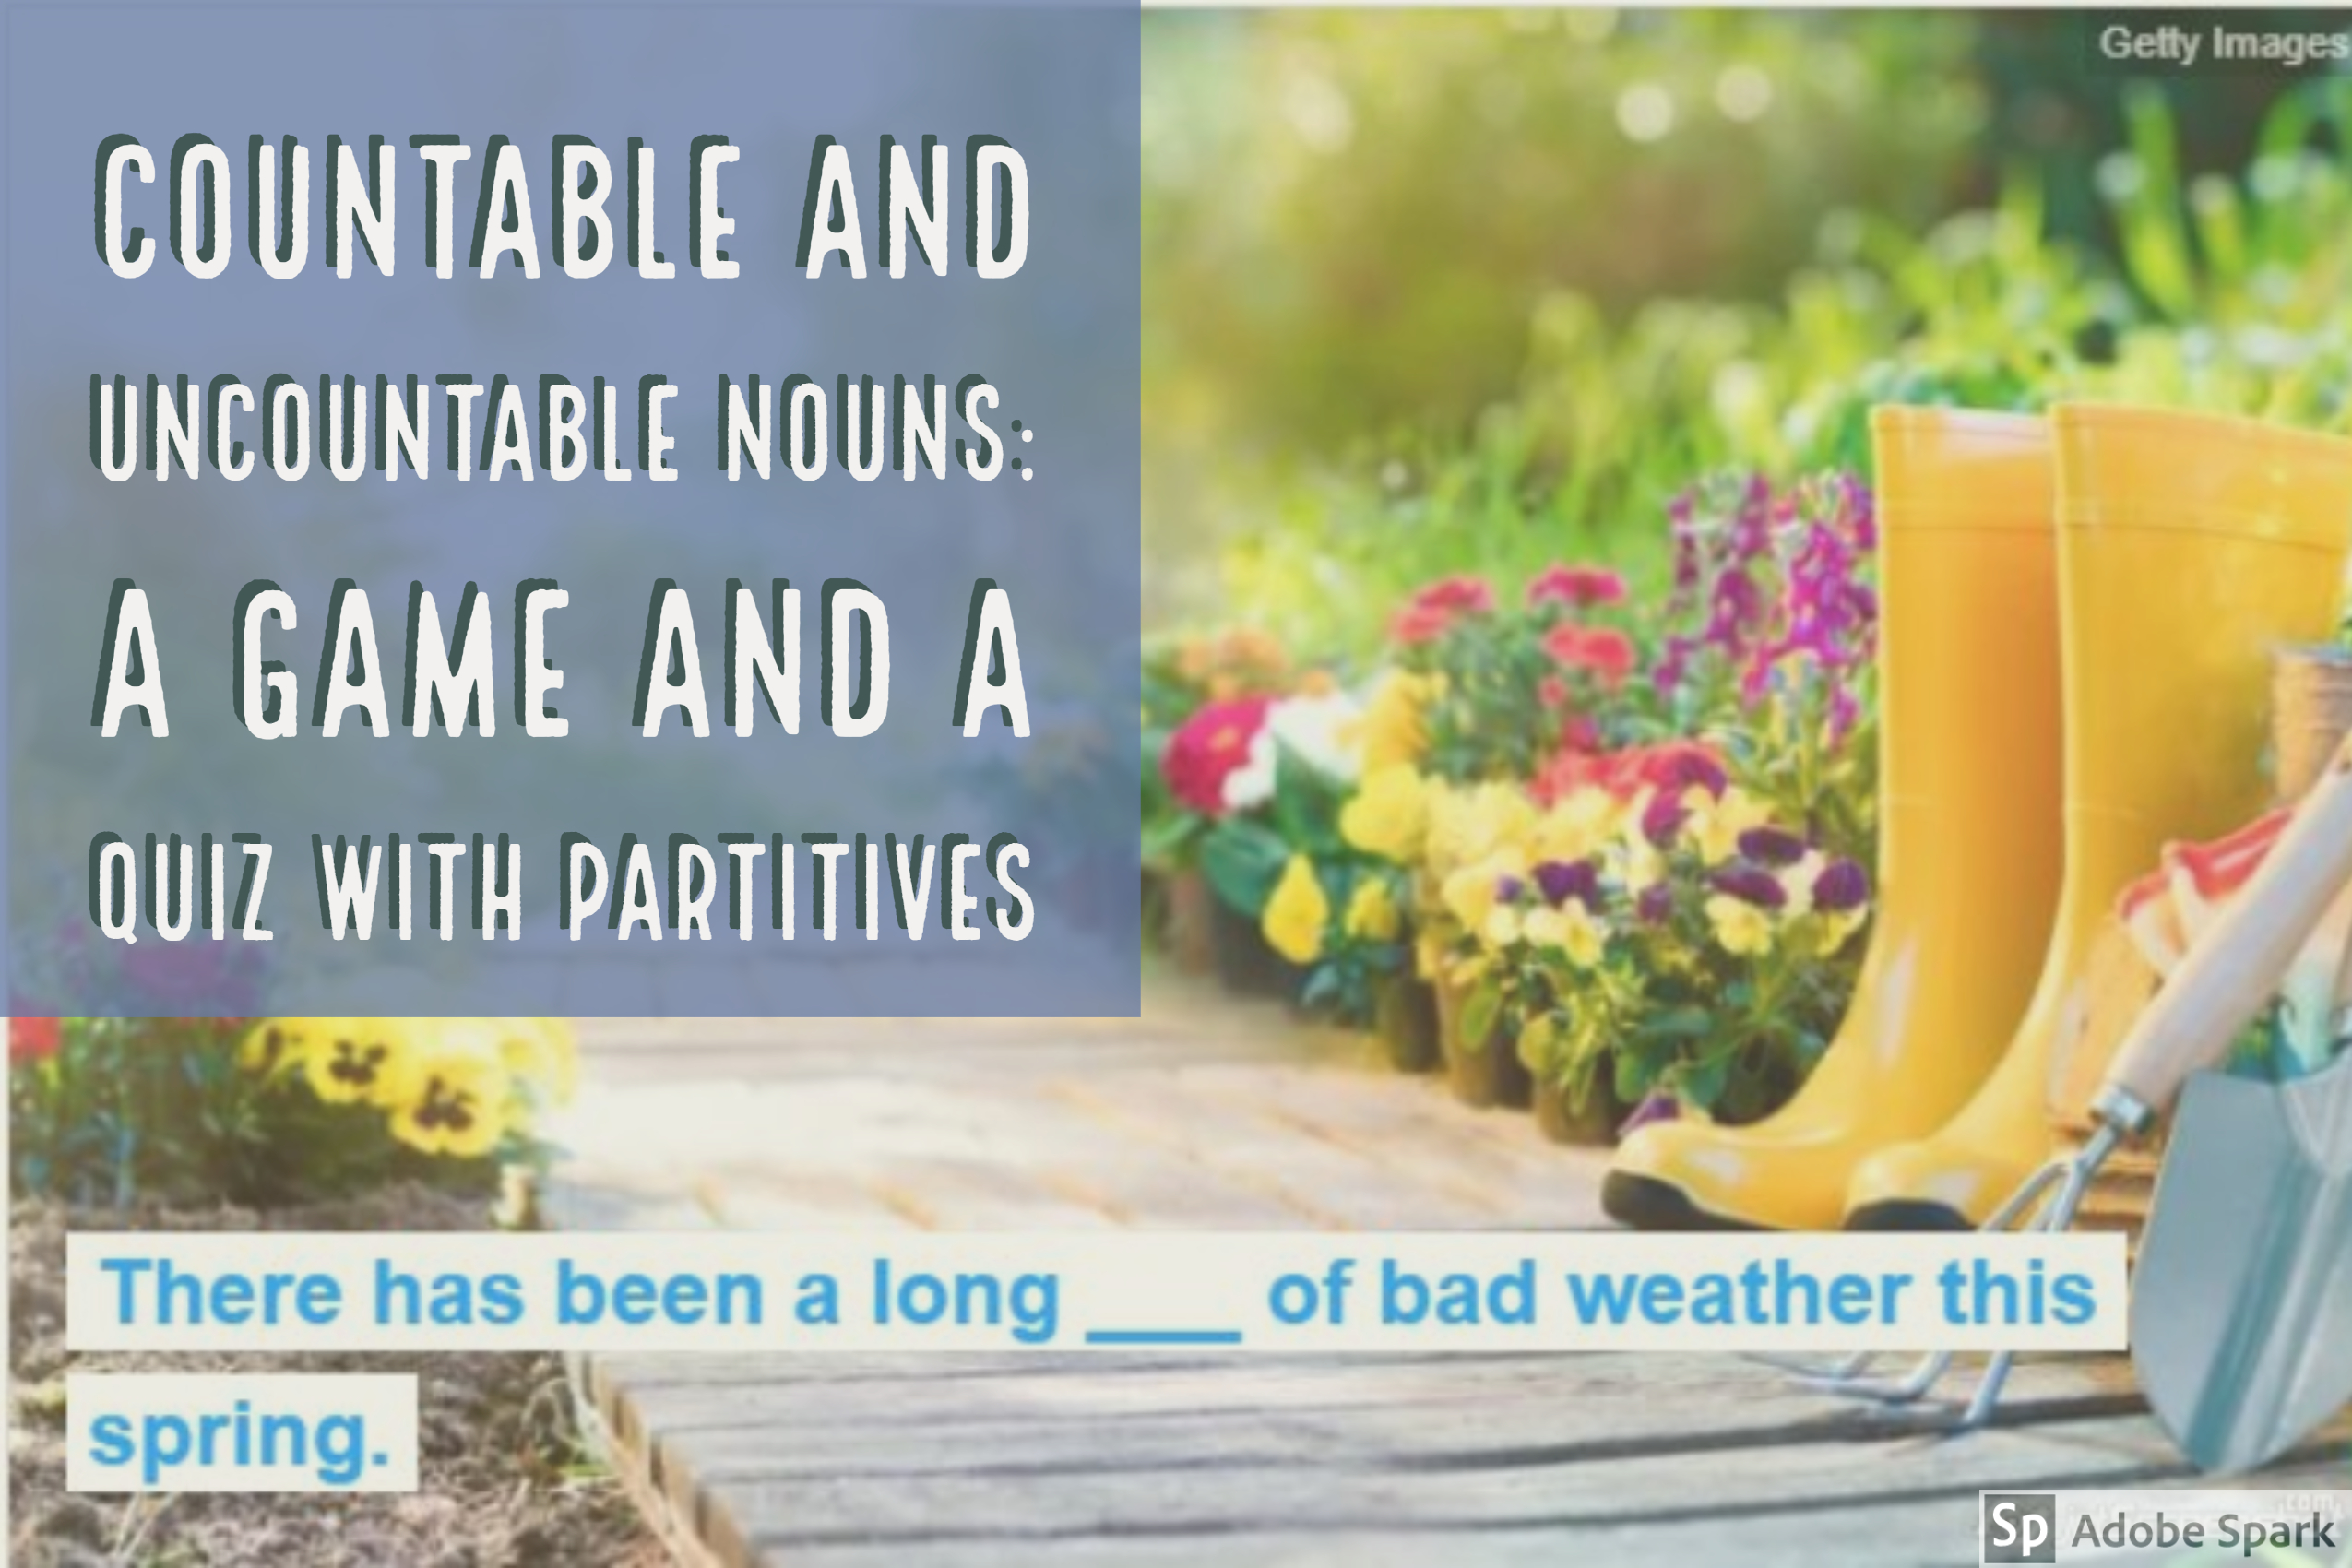
So, how can we make an uncountable noun countable? That’s easy! Very often, we can use “a piece of…” before the uncountable nouns.
We can say:
A piece of fruit/cake/cheese/baggage/furniture/news/rubbish/research… etc
But English wouldn’t be considered one of the richest languages if you could just use “ a piece of” with every uncountable noun, would it? So here’s a quiz where you will learn some other partitive structures used with uncountable nouns.
How I suggest you work with the quiz:
You can certainly do the quiz once if you have a prodigious memory and are able to remember every combination, but if you are like the rest of the mortals, taking the quiz once is not enough.
I would suggest taking the quiz two or three times, then writing down all the combinations you can remember and then taking the quiz again to check and consolidate.
And finally, it’s springtime. “Here comes the sun da-da-da-da”. After, like two months raining non-stop and cold spells whimsically coming and going, I was beginning to flirt with the idea of leaving “sunny” Spain. But, fortunately, it seems spring is here to stay. And this means light. Don’t you feel more energetic when you wake up in the morning, and there is this beautiful sunny day waiting for you outside? I do.
It seems to me that even explaining reported speech introductory verbs is a lighter task.
Here you can read some of the activities I did with my students to introduce, revise and consolidate reporting verbs. I have used a variety of online free tools. Free tools, as usual.
Aim: to introduce, revise and consolidate reporting verbs other than “say” “ask” and “tell”
Level: B2
AN INFOGRAPHIC TO CONSOLIDATE THE GRAMMAR STRUCTURE OF SOME REPORTING VERBS
I like infographics. They are colourful and can be displayed on the walls of the class for students to refer back to if they, God forbid, forget the grammar of these verbs. Honestly? I like creating them. I like playing with the fonts, icons, lines and anything the site has to offer to create them.
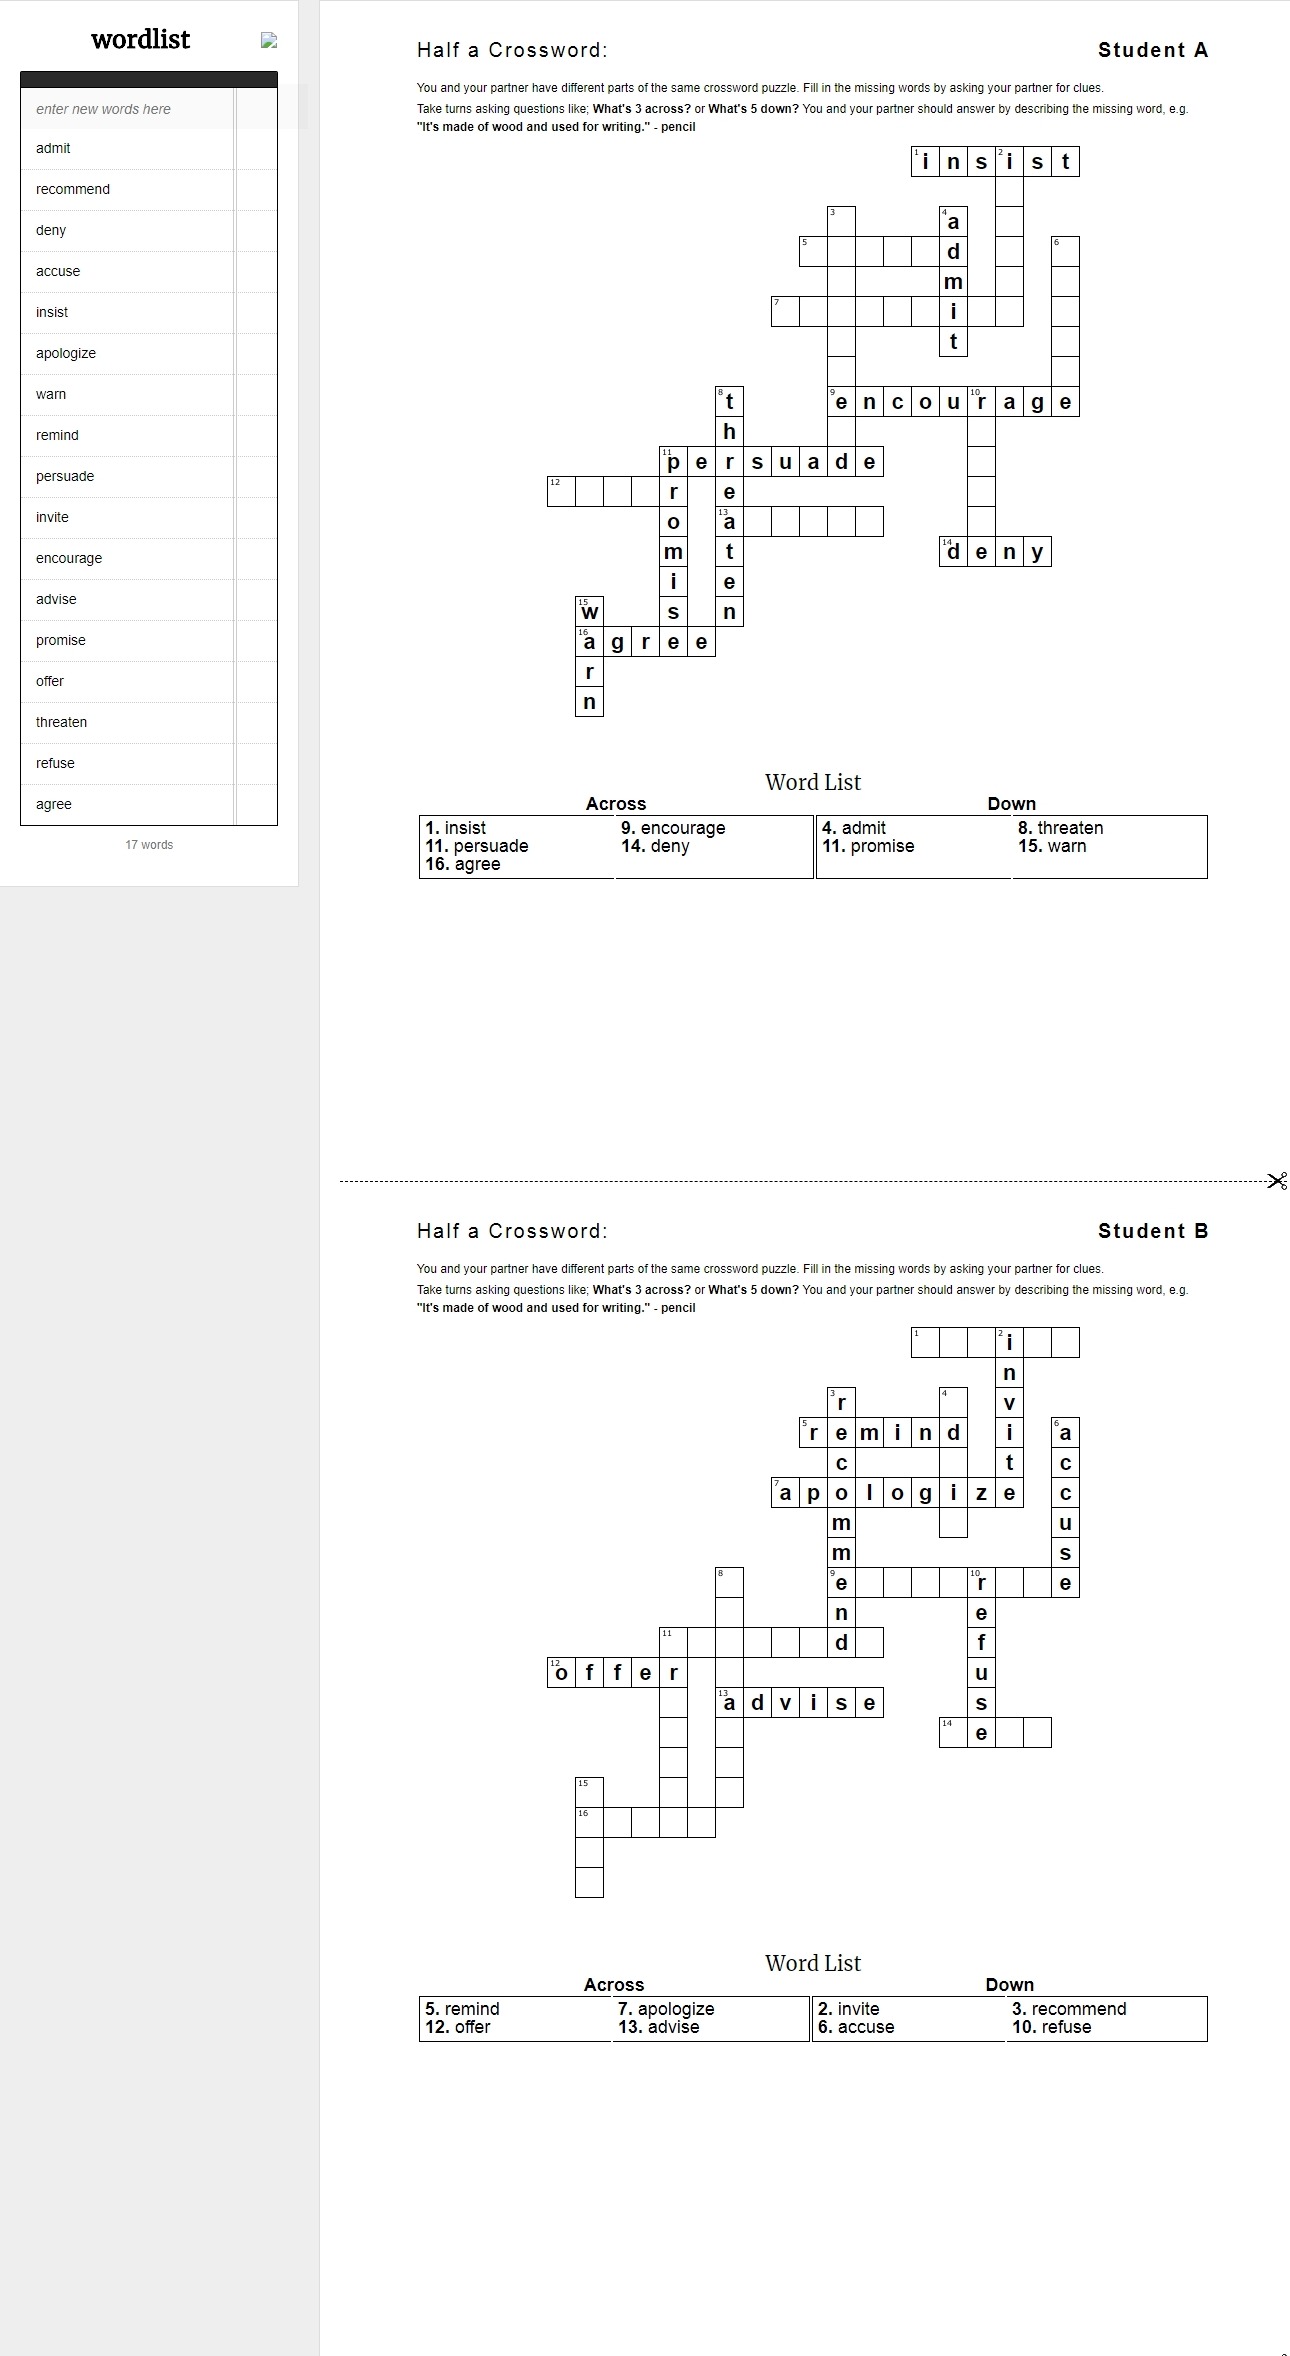
A "HALF-A-CROSSWORD" GAME TO HELP THEM REMEMBER THE MOST COMMON REPORTING VERBS.
This kind of exercise gives students a nice opportunity to use a variety of skills.
I have used a free website with a very complicated name, which I am not even going to attempt to write.Here’s the link. The only thing you need to do is write the terms in the box provided and then print the outcome. It’s magic.
A STUDY-SET OF FLASHCARDS
Students should be ready to get into more demanding exercises as are the ones I suggest below.
In this exercise, students orally provide the reporting sentence. The exercise has been created with quizlet, a well-known free tool I highly recommend as study sets are very easy to create and it’s great for rote learning. Although it offers a premium version, the free one is quite generous.
Depending on how confident your students feel, you can set this task to be done as an individual written exercise or orally as a whole class exercise.
Created with quizlet
USING GRASS SKIRTS: A TRANSLATION EXERCISE
This is game from the archives. I highly recommend you do it with your students. Lots of learning and lots of fun too. Your students are going to adore you.
Before the class: Decide on 8 sentences using a variety of reporting verbs you’d like your students to translate. You can use Tekhnologic’s template or create your own. Write the sentences in the spaces provided. Print as many copies as you need and cut along the dotted lines. Each group of three or four students will be assigned a copy. A good idea would be to use a different coloured paper for each group, but this is entirely optional. Put them on the walls of the class.
Now, you are ready to start.
Procedure:
Ask students to work in groups of three or four. Draw students’ attention to the walls of the class and assign each group a poster with the 8 sentences.
Tell students that the aim of the game would be to translate all the sentences on their assigned poster on the wall. To do so, they must nominate a runner who is the one who must run to the wall, tear off the sentence, run back to his group and then together translate the sentence.
Once it’s done, the runner must go to the teacher and show him their translated sentence. If it’s correct, the runner can tear off the second sentence. If it’s incorrect, he must return to his group and correct the mistake(s). The teacher can help a bit by underlining where the mistake is. Only if the teacher has marked the sentence with a tick, it is considered correct.
Rules.
The runner cannot tear off a new sentence until the previous one has been shown to the teacher and marked with a tick.
The runner cannot correct the sentence at the teacher’s desk. He must return to his group and there, correct the sentence.
Groups can only tear off sentences from their assigned posters.
The first group to have a tick in all 8 sentences is the winner.
Follow-up: Whole class. Read out the sentences from the poster and ask students to, orally, translate them. Focus on any common problems you might have noticed.
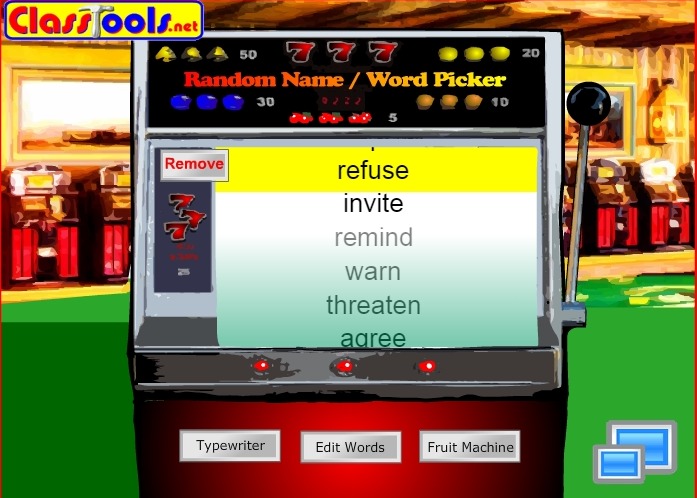
THE FRUIT MACHINE: A MORE DEMANDING EXERCISE ALLEVIATED WITH A BIT OF FUN
This activity is probably the most challenging in this compilation.
How to go about it:
Divide the class into two teams, Team A and Team B. Ask a representative of each team to come to the front of the class facing away from the board where the fruit machine is displayed. Let’s call them Captain A and Captain B.
Set a timer for 90 seconds.
The activity has two parts:
Part 1. Team A starts playing. Spin the fruit machine and a reporting verb will be randomly chosen.
For example: Suggest
Team A needs to, using direct speech, come up with a sentence to exemplify “suggest”
For example: “Why don’t we go to the cinema?”
Captain A needs to guess the reporting verb associated with the sentence. If he does his team scores 1 point.
Part 2. Ask team members to repeat their sentence and have Captain A report the sentence using the reporting verb in indirect speech. If he does, his team scores an extra point.
Teams have a maximum of 90 seconds to do part 1 and 2.
Now, it is Team B’s turn to play.
I have created this activity with classtools.net. Click on the image to see the fruit machine in action. Warning: you might want to turn down the volume in your computer.
When applying for a job, there are some things you might have to do:
Send a résumé or a CV ( Curriculum Vitae)
Fill in an application form
Write a letter applying for a job
In this post, I’ll guide you step by step to help you write a good cover letter and a résumé
Step 1. The difference between a résumé and a CV
Step 2. Writing a CV or a résumé. Templates
Step 3. Writing a cover letter. Some tips.
Step 4. Layout of a cover letter.
Step 5. Sending your cover letter via email.
Step 6. Some tips on how to answer a job interview.
Let’s start.
Step 1. What’s the difference between a résumé and a CV?
It’s more or less the same. The CV is longer than the résumé. The résumé includes a summary of your education, experience, and skills and it’s usually one page long whereas the CV is two or three pages long and includes more details like research, awards, presentations, publications …etc. It’s ideal for academics.
Some tips:
Keep it simple. It shouldn’t be longer than two pages.
The content should be easy to read
Use reverse chronological order. You should put your most recent job first and then write the other jobs going back in time.
You don’t have to write full sentences. Ex: “Developed a social media strategy…”
Skip personal information such “Divorced and with 2 kids”.
Step 2. Writing a CV or résumé. Templates.
Here are two links to templates to write your CV or résumé. (Please note that this is not a sponsored post)
Canva’s Résumé Builder: you will need to register and then enter your name for free résumé templates based on your style.
Uptowork: provides guided free templates to build your résumé or CV.
Step 3: Writing a cover letter. Some tips
A job application letter, also known as cover letter normally accompanies a résumé or CV. Nowadays, unless you are specifically required to send a letter by snail mail, cover letters are normally sent by email or attached as a file in online application systems.
Sending an email instead of a letter makes little difference. It’s only the layout that varies slightly.
Now here are some tips:
Use formal language.
Don’t use contractions and punctuation such as dashes and exclamation marks.
Don’t use personal or emotional language.
If you are replying to an advertisement, relate to all the points asked for and give additional information.
Mention your skills and experience and give supporting details.
Have spaces between paragraphs
Keep it short and to the point.
Use a professional email address; kittylou@gmail.com might not be appropriate or very professional.
Remember to check that you have used the appropriate style for the person you are writing to.
Check your email carefully for spelling, grammar mistakes, and punctuation
Make sure you sign your cover letter.
If you are sending your CV or résumé, put “Enclosed: CV/résumé” at the end of
your cover letter
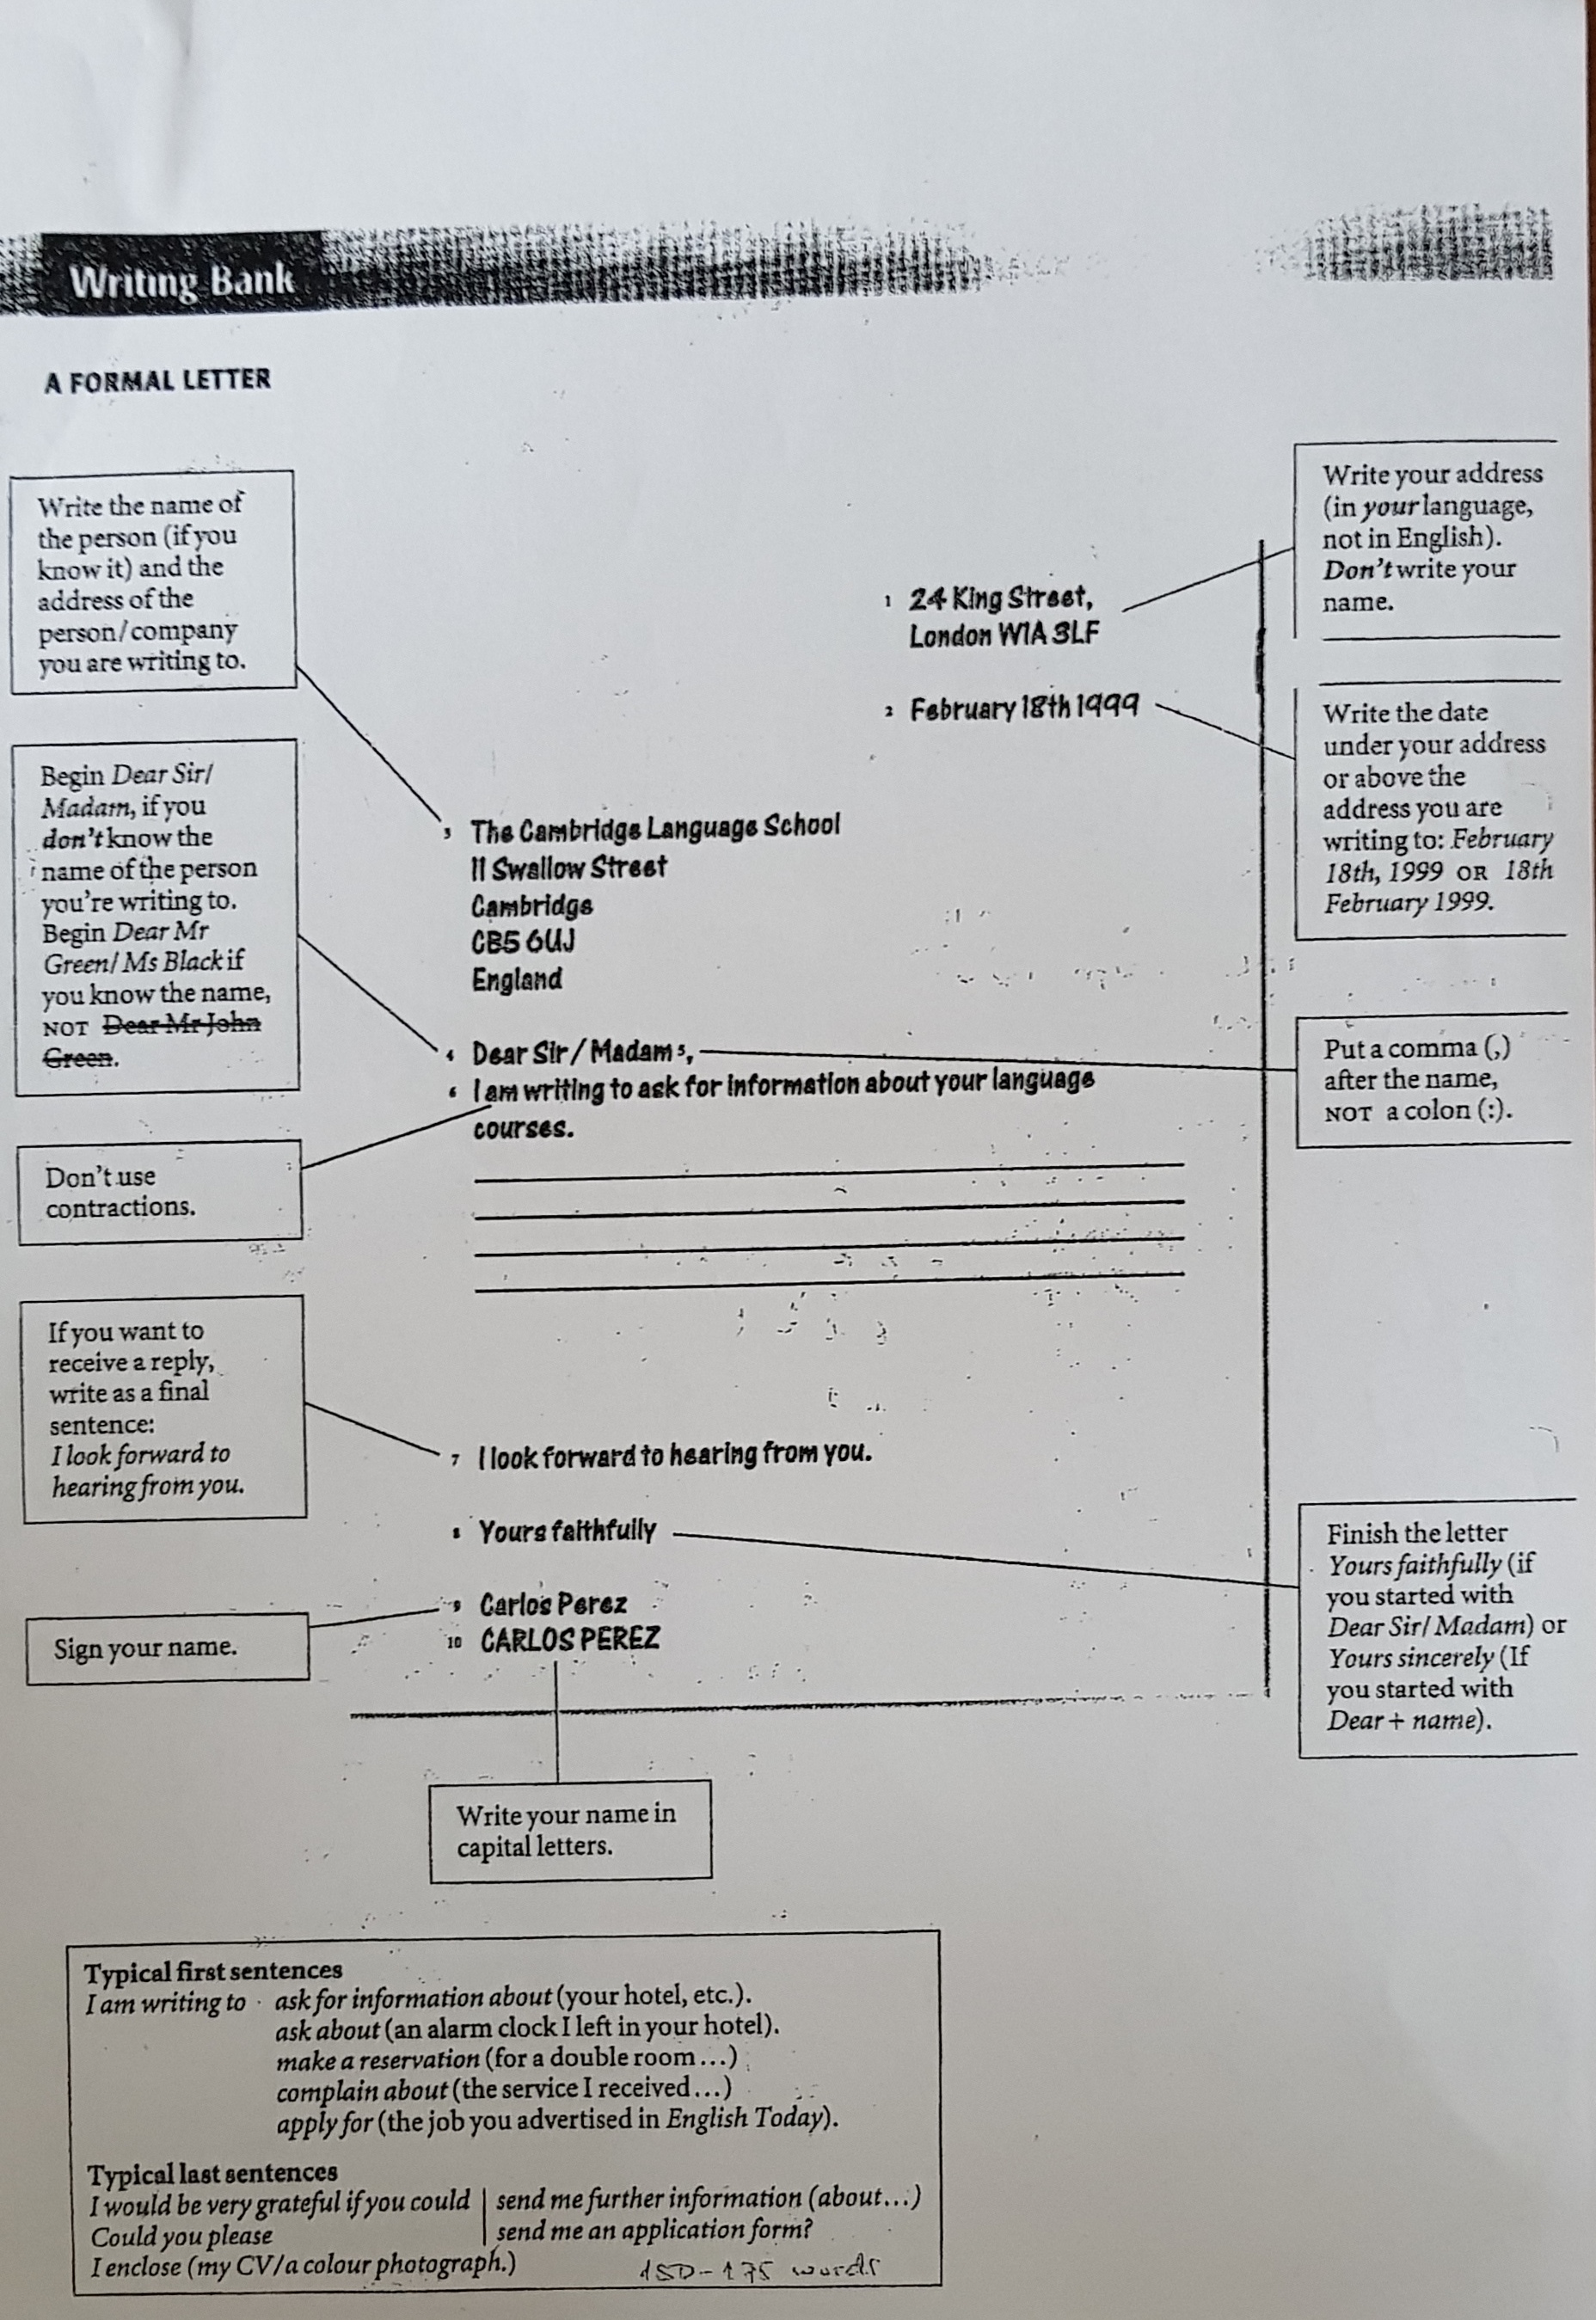
Your address: on the right-hand side of the page (without your name)
Date: below your address. Leave a blank line in between.
On the left
Position/name of the person you are writing to. Start one line below the date.
Address of the person or company you are writing to.
Greeting:
Use an appropriate formal greeting. Use a comma after the greeting or nothing.
If you know the name of the person you are writing to:
Dear Mrs/Miss/ Ms + surname if you are writing to a woman
Dear Mr+ surname if you are writing to a man.
If you don’t know their names, use
Dear Sir or Madam or Dear Hiring Manager or Dear Human Resource Manager
Alternatively, you can use To whom it may concern
Note that all the salutations start with Dear.
Follow the salutation with a comma.
Opening Paragraph: Always start by stating what the purpose of your letter is. Here you should mention the position you are applying for and where you learn of the vacancy. This section should be short and to the point. It’s the most important part of your letter. Here, either you grab the reader’s attention or you can bore him and decide not to continue reading.
Some useful expressions:
I am writing in response to your advertisement for…
I am writing to express my interest in the …. position listed on …(name of the website)
I am writing with reference to your advertisement…
I would like to apply for the …. position advertised in /on……
Main Body: It can be divided into several paragraphs. Organise your content into the different paragraphs.
Here you need to expand on your experience and qualifications showing how you are relevant to this job. Give clear details and examples. You don’t need to repeat all the information on your résumé but highlight what is relevant to this position. Emphasize your strengths.
Emphasize also your interest in the job and why you think you are suitable for the job. Remember that your goal is to get a job interview.
If you have attached a copy of your résumé or completed an application form, mention it.
Useful expressions:
I think I am the right person for the job because…
I feel I am well qualified for the position
I think I have the knowledge and experience that is needed for…
I have some/ a lot of experience working with…
With regard to your requirements, I believe that I am a suitable candidate for this post as
I believe I would be good at…
I believe I would make a good …. because I am…
I am very reliable and I get on well with people…
I have always had an interest in…
I think I would be suitable for the job / a good choice ( to be a/ an…) because...
Closing Paragraph:
Explain why you think your application should be taken into consideration. If relevant, mention that you enclose a CV/ reference. State that you are willing to attend an interview and thank the reader.
Useful expressions:
A résumé/CV giving details of my qualifications and experience is attached
As requested, I am enclosing my CV and two references and my completed job application
I hope you will consider me for the position.
I would be able to start immediately
I would be happy to attend an interview any time convenient to you.
Signing off
Using I look forward to hearing from you or Thank you for your time and consideration are good ways to end a formal letter
End with Yours faithfully if you begin with Dear Sir/Madam
End with Yours sincerely if you begin with Dear Mr/Mrs/Miss/Ms + surname
In American English, Yours truly and Yours sincerely are commonly used in both cases.
If in the greeting you have followed the salutation with a comma, write a comma also after Yours faithfully/sincerely.
Some words commonly used in job applications
Nouns such as preference, qualifications, company, reference, information, opportunity, experience, position, vacancy, ability, advertisement, employment, résumé, details, interview…etc
Verbs such as apply, reply, advertise…etc
Adjectives such as convenient, excellent, qualified, enthusiastic, necessary, energetic, suitable, available, attached, experienced, interested, responsible, possible, friendly…etc
Adverbs such as immediately, recently, extremely, sincerely…etc
In the subject line of the message, write your name and the job you are applying for.
Don’t write the date or the employer’s contact information. Start your email with the salutation
Don’t forget to write all your contact details after you sign off.
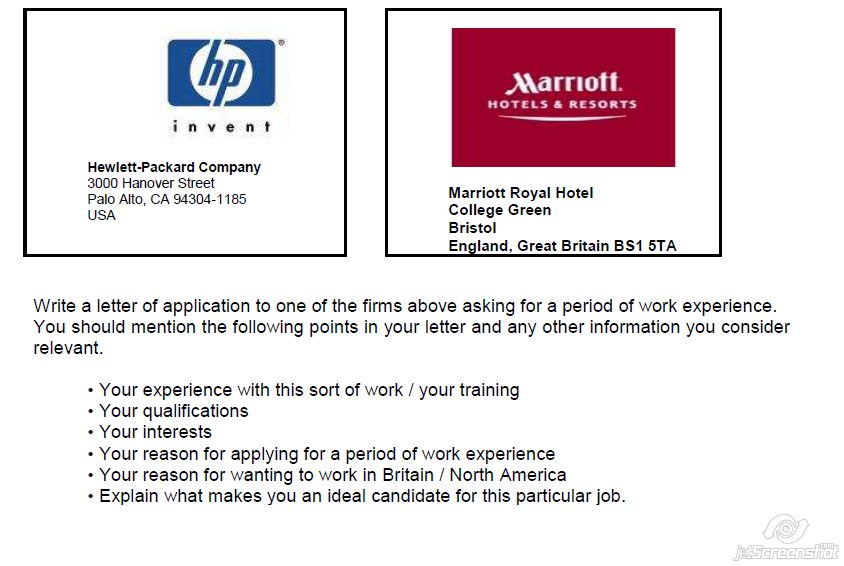
Practice:
Write a cover letter/email applying for one of these two jobs.
Step 6: Some tips on how to answer a job interview
When they ask you to describe yourself in three words, they are asking you about your professional persona and how you would fit in the company. Talk about what makes you stand out. Talk about accomplishments and skills that you know are relevant to the job you are applying for.
Do some research on the company and show it in your answers.
Don’t give them personal details. They are not really interested in your life or your problems.
It’s Ok to ask the interviewer questions about the job. You also want to make sure this is the right job for you and at the same time show the interviewer you are interested in the job. Prepare them beforehand and try not to ask yes/no questions:
Can you tell me about the responsibilities of this job?
What are the biggest challenges facing the company/department right now?
If you think they are boring, perhaps I might succeed in changing your mind once you read about this activity.
Writing is always on my mind (like Joe Manganiello 😀 ). It ‘s true that I should probably dedicate more time to writing tasks in class, but writing takes a lot of time and time is a luxury I cannot always afford. For this reason, I try to do small writing activities that take less time but have proven very effective.
If you have been reading my blog for some time you have probably guessed a thing or two about me: I am a huge fan of competitions and anything that brings fun and a relaxed atmosphere – and probably a little bit of noise- into the classroom.
I think the exercise I’m about to describe combines perfectly well the two above. I have used it to revise reported speech (indirect speech) and more specifically reporting verbs, but it can be easily adapted to any other point of grammar you need to revise.
In case you are wondering, below is a picture of the grass skirt I have used for this activity. You can also call them tearable sentences, but I like grass skirts better. You can make your own template o download the one Tekhnologic very kindly offers on his website. I have used his.
The activity
Before the class: Decide on 8 sentences using a variety of reporting verbs you’d like your students to translate. You can use Tekhnologic’s template or create your own. Write the sentences in the spaces provided. Print as many copies as you need and cut along the dotted lines. Each group of three or four students will be assigned a copy. A good idea would be to use a different coloured paper for each group, but this is entirely optional. Put them on the walls of the class.
Now, you are ready to start.
Procedure:
Ask students to work in groups of three or four. Draw students’ attention to the walls of the class and assign each group a poster with the 8 sentences.
Tell students that the aim of the game would be to translate all the sentences on their assigned poster on the wall. To do so, they must nominate a runner who is the one who must run to the wall, tear off the sentence, run back to his group and then together translate the sentence.
Once it’s done, the runner must go to the teacher and show him their translated sentence. If it’s correct, the runner can tear off the second sentence. If it’s incorrect, he must return to his group and correct the mistake(s). The teacher can help a bit by underlining where the mistake is. Only if the teacher has marked the sentence with a tick, it is considered correct.
Rules.
The runner cannot tear off a new sentence until the previous one has been shown to the teacher and marked with a tick.
The runner cannot correct the sentence at the teacher’s desk. He must return to his group and there, correct the sentence.
Groups can only tear off sentences from their assigned posters.
The first group to have a tick in all 8 sentences is the winner.
Follow-up: Whole class. Read out the sentences from the poster and ask students to, orally, translate them. Focus on any common problems you might have noticed.
Give runners a round of well-deserved applause and maybe something to drink 😆
I am not a big fan of watching TV. I find most programmes dull and very often uninteresting. However, one of the very first things I do as soon as I wake up (this, of course after my first cup of coffee) is to watch the news. However, lately, I have been considering skipping them. Is it me or do you have the impression that the news is filled with disaster and corruption? How can you be expected to rise and shine when the world is going crazy, when all the stories in the news are about crimes and criminals? I’d rather watch the weather forecast! Hey! Hold on!! Just heard about hurricanes and floods? I think I’ll stick to Netflix.
Anyway, please excuse my rambling and let me share with you some of the activities I have designed to help my students learn and practise vocabulary related to crime in a series of engaging speaking activities.
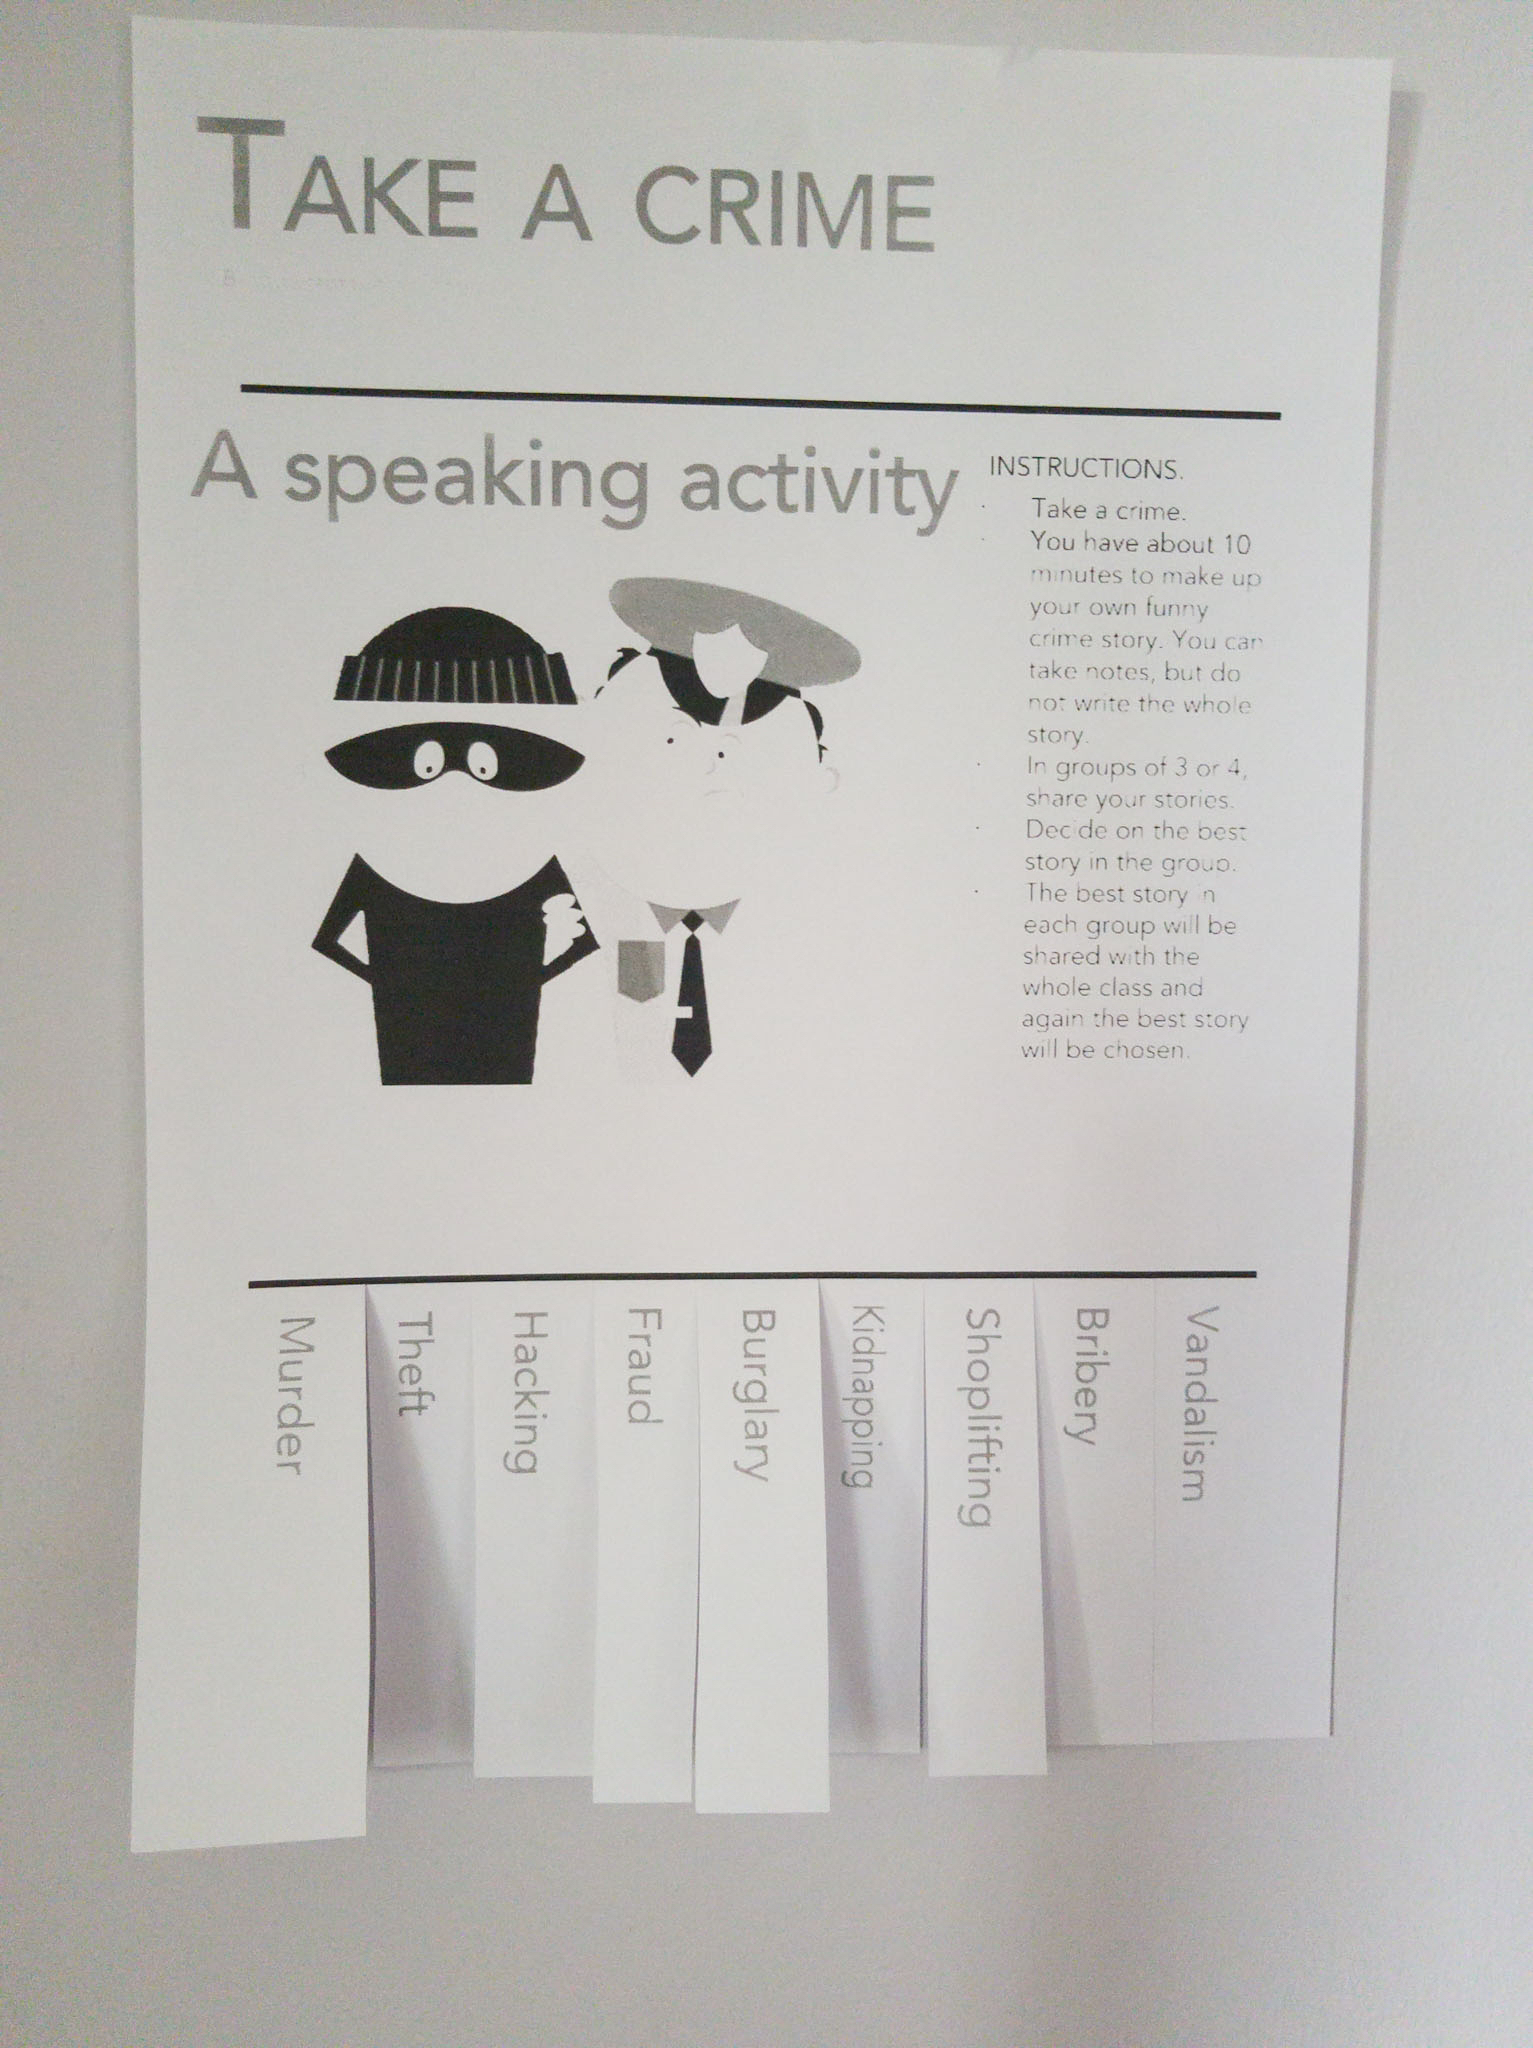
Using grass skirts. Making up a funny crime story
Preparation:
Choose a number of crimes and write them down. You can use my own template. See it here.
Cut a line between words (see picture) but don’t cut them all the way so that the slip of paper doesn’t detach.
Each poster contains 9 crimes. If you have between 10 and 18 students you will need two copies of the poster.
Put the poster(s) on the walls of the class.
Procedure:
Point to the posters on the walls of the class.
Tell students they will have about 10 minutes to make up a funny crime story. They can take notes but they cannot write the whole story.
Ask students to stand up and take a crime. They will do it by tearing off the piece of paper containing the crime.
Students sit down and began making up their funny crime stories.
In groups of 3 or 4, they share their stories and decide on the best story in the group.
The best story in each group will be then shared with the whole class and again the best story will be chosen.
Using a Feedback Tool to play a game to revise vocabulary.
This one is a lot of fun. Believe me!
Aim: to revise vocabulary related to crime using the free online tool Answergarden
Preparation: Minimal.
If you have never used a feedback tool, you really should give it a try. I have used feedback tools and also backchannels in my classes in a number of ways to teach English and I like them for several reasons.
They are very effective
They tell you in real time whether students are really learning or not.
They give voice to all the students and not just to the ones who always raise hands.
They are fun and make classes more interesting and engaging.
Downside: it requires the use of devices with an internet connection. However, two students can share the same device.
If you find it hard to integrate technology into your classes, I run workshops on the use of online free tools in the language classroom (tool+practical tested ideas+practice designing your own activities- see workshops here)
How to set a room in Answergarden in less than 1 minute.
Go to Answergarden and click on Create Answergarden
Type your topic or question
Set Classroom or Brainstorm Mode
Set the answer length to 20 characters
Click on Create and share the link with your students.
Students submit their answers and they are represented in the form of a growing word cloud.
Tip: Don’t forget to refresh your page to see all the answers the students are submitting or to choose the expand tab which will refresh the page automatically every 5 seconds.
The Game.Procedure
Step 1. Creating the wordcloud
Share the link for the Answergarden you have created and ask students to submit words related to crime. Their answers will be represented in the form of an attractive wordcloud.
(Note: This is an active answergarden. You can submit words, but please, only words related to crime 🙂
Step 2. Playing
Divide the class into two teams and ask a representative of each team to come to the front of the class facing away from the board where the word cloud is displayed. Let’s call them Captain A and Captain B. Place a table in front of the students and on the table place two reception bells. If you can’t find the bells, any other sound would do! But, there has to be a sound, mainly, because it’s fun!
Set a timer for 90 seconds. Teams have 1m 30´ to describe as many words as possible. Point to a word and ask the class to describe the word using synonyms, definitions or paraphrasing. If a captain knows the word, he will need to press the bell and then say the word.
If the answer is correct, his team scores a point and the game continues in the same way until the time runs out. The teams choose other captains to continue playing.
If the answer is incorrect, he won’t be allowed to guess again until the other captain has had a chance at guessing.
Random Questions- A Speaking Activity.
I have created the presentation with questions to discuss about crime and punishment with the free tool Genial.ly
Procedure:
Ask students to write on a small scrap of paper 5 words they have learned. If they have learned “ to be sentenced to” for example, encourage them to write the whole expression and not just “sentenced “.
Click on the random question button in the presentation. Ask students to swap slips of paper with their partners and get them to discuss the question reminding them to use as many words from the slip of paper as possible. Allow 4 or 5 minutes to discuss this question.
Ask students to swap lists again before asking them to stand up and find a new partner.
Click on the random question button in the presentation again and repeat procedure.
Hope you have enjoyed the activities.
You can follow the blog on Facebook and on Twitter.