Tag Archives: tips

Some Spanish Slang, How to Say it in English and a Strategy to Make it Fun.

If you love giving quizzes to your students or if you are a student yourself, you’re going to love doing this quiz. Why? Because in this quiz, students are going to learn some expressions that are not in the dictionary. Well, some of them might be. Plus, they are going to take an active role when answering the questions in the quiz. All of the students. Keep on reading!

Why is not giving the quiz enough for me?

It very often happens that when you display a quiz such as this one for the whole class only a bunch of students – normally the ones who volunteer for everything you do in class- actively participate in giving the answers.

Well, this is not enough. Not for me. I need all the class to participate. And I don’t really mind here whether the answers are correct or incorrect. That’s not the point. The point is that they are, at least trying. And trying is learning, And making mistakes is learning.

NOTE: I am well aware that there is not just one way of saying the expressions in the quiz. This is just the way I say them.

(Click on the image, it will take you to the quiz)

Procedure
  • Give each student two pieces of paper; 10×7 cm approx. will be perfect.
  • Ask them to write on one side the letter A and on the other side, the letter B. On the second piece of paper, ask them to write the letter C. Tell them to write the letters big enough to see from a distance.
  • The letters A, B and C correspond with the three possible options in the quiz. For example, if they think the second answer is the correct one, they should choose and show the letter B.
  • Tell students they will be competing in pairs and they should keep score of the points each of them gets. If both students guess the correct answer, no points are awarded; but, if one student beats the other one in a question, that’s when they score a point.

BONUS: A nice idea to keep track of the points they score is to use, for example, chickpeas, pasta or peas. That adds a fun touch to the exercise.


  • Display the first question. Give students 10-15 seconds to think. Say “UP” and have students display the correct answer. Students in pairs compare their answers and score points, if necessary.

Follow-up

Sadly, just because they do the quiz once does not mean they are going to learn the content in it. You will need to revise it, and not just once. So, this is what I do:

      1. Once they finish, ask them to write down all the expressions they remember and share them with the class.
      2. Display the quiz again, one question at a time, but do not show them the answers. Students will need to try to remember the correct answer.
      3. Give them the link to the quiz to practise again at home.

That’s all! I hoe you have enjoyed the post!

Some Tips to Score High in Paired Oral Interaction Exams

March means the clock is ticking and my students are beginning to feel the pressure of getting ready to take standardized exams. Not an easy thing to do when it comes to taking oral exams and the pressure and the tension can sometimes be overwhelming.

The most important tip I could probably give you is practice, practice and practice. Remember the saying “Practice makes perfect”

Let’s start  ♥

What you need to know about this part
  • In this part, two or three candidates will be asked to speak together. The examiner will give you a task and there will be some prompts to talk about. You’ll need to express your own opinion and also ask for your partner’s opinion, you will need to share ideas and interact discussing some of the points written on your worksheet.
  • You’ll have 1 or 2 minutes to look at the task, but you won’t be able to take notes. Your conversation should last about 5 or 6 minutes.
  • You need to perform well in terms of Interactive Communication.  You need to ask questions, ask for opinion, suggest…etc and link your contribution to what the other candidate has said.
Tips
  • This is an interaction between two or three students, so you might want to think of the questions you want to ask your partner to ask for his opinion or preference.
  • Remember that this is not a monologue. You should speak and address your partner, not the examiner.
  • Be prepared to start a discussion with your partner, as well as respond to what they
  • have to say.
  • If you make a mistake, correct it. Obviously, it’s better not to make any mistakes but if you do, correct it and carry on talking.
  • Remember this is not a listening exam, it is a speaking exam. Speak as much as possible when it’s appropriate.
  • Be sensitive to turn-taking. The other candidate has to speak too. You need to find a balance between speaking too little and too much.
  • There are no right or wrong opinions. We are assessing language here.
Do's
  • Think about vocabulary you might want to use
  • Don’t forget that it is important to use a wide variety of structures.
  • Keep in mind you’ll need to state your opinion elaborating on it, ie, giving reasons
  • Don’t just talk about a single idea. You won’t probably have to talk about all the points suggested in the worksheet, but you should not focus on only one. You need to move from one idea to another.
  • Just remember to speak clearly so that both the interlocutor and assessor can hear you
  • Remember your pronunciation should always be intelligible.
  • Make sure you take every opportunity to speak.
  • Listen to your partner carefully and link what you say with what the other candidate says
  • If you are not sure what to do, ask for clarification.
Don't
  • Learn long answers or speeches by heart.
  • Don’t leave long or frequent pauses.
  • Don’t interrupt your partner when he is speaking,
  • Don’t give short answers or one-word answers. Elaborate on your ideas.
  • Don’t talk to the examiner. Talk to the other candidate.

Some functional language you might want to use:

Asking for opinion: what do you think about …? What are your thoughts on…? What about you? How about you? Do you agree?

Suggestions: How about moving on to….? Let’s discuss a different one now. Let’s talk about the advantages now.

More functional language here

Examples
  • See an example below

  • Oral Interaction Exams from EEOOII Castilla-La Mancha. Here
  • Video of a mock exam explaining what to do and not to do in an oral interaction exam.

I am a huge fan of Simple English Videos and I have found this one below that might give you an idea or what to do and what not to do in the exam.

The Two-Corner Technique. How I Train my Students to Pass the Standardized Speaking Exam.Part 2

It’s Monday. I swear it was Friday when I last blinked. Exam time is inching closer and closer and I figure it’s about time I share part 2 of how I prepare my students to take oral exams. Please, note that attending classes and piling up dozens of photocopies helps, but this alone does not guarantee you are going to pass the exam. Practice. Keyword here.

In Part 2, you are going to read about the two-corner technique and the websites  I use to help my students gather ideas.

The anecdote.

What I am going to relate here is one of the reasons why I try to offer my students not only vocabulary and structures but also ideas. Yes, I present them with different ideas, but  I don’t ask them to study and use them as if they were theirs, I ask them to discuss them. Why? Mainly because by discussing ideas they can develop their own, acquire some others and also learn to challenge opinions they do not agree with.

You have probably heard students, or experience if you are one, talk about this fear of not knowing what to say.

Only last week I set a writing activity to be done in class. I asked students to write for about 20 minutes giving their opinion about a topic we had already discussed in class.

I observed one of my students was not writing but staring into space. After 5 minutes, I approached him and asked why he wasn’t writing. He said he could not come up with any ideas, said he wasn’t inspired and that he was afraid this would happen on the day of the exam.

And I worry. Even though my students study hard, sometimes they find it hard to think on their feet and start talking or writing.

It’s with this in mind that I try to provide my students not only with grammar and vocabulary but also with other people’s points of view on a given topic so that they can discuss these ideas and develop their own arguments. Speaking is not only talking about what you would do but also about what you wouldn’t do.

Topic:  Ebooks versus paper Books

Level: B2 (upper-intermediate)

Time: about 30 minutes

  • Step 1.  Brainstorming vocabulary.  As usual, we brainstorm vocabulary on the board. This is a necessary step as you don’t want students to get stuck because they can’t come up with a term.
  • Step 2. Posing the question.  I write on the board ht e big question. In this case: What do you prefer? Ebooks or paper books?
  • Step 3. Using the two-corner teaching technique.  This technique is actually called the four- corner technique, but I find a two-corner approach suits my classes better. With this technique, you get your students out of their seats and thinking about the topic they are going to discuss. In one corner of the classroom, I put up a notice saying paper books and in another corner a notice with ebooks written on it.

I ask students, still in their seats, to think which corner of the room they would choose and think of the reasons why they prefer one choice to another. After a bit of thinking time, I ask them to stand up and go to their corner of the room. Once there, they talk to the members of their group sharing ideas and talking about why they favour one choice and not the other.

  • Step 4.  Getting ideas from other sources.

Time to see how others express your same idea and maybe get some others. Give students in favour of ebooks handout A and give handout B to students who prefer paper books. Let them read it and comment it in their groups.

  • Step 5. Persuading and Convincing

This is the part I like best. Pair up students from both corners. Their aim will be to campaign on behalf of their choice and try to convince a student from the opposite corner to flip sides.

For this activity, I have used the website https://netivist.org/ , which is a platform where users can debate and engage in thoughtful discussion sharing different points of view.

Other  similar websites  are:

https://www.kialo.com/

https://debatewise.org/

Going the extra mile?

  1. Students practise talking about what these two sets of pictures suggest to them

2. Students listen to what other people have to say on the subject.

If you have missed Part 1 of how I prepare my students to take oral exams, you can read it here

Step by Step: How I train my students to pass Part 2 (the pictures) of the standardized speaking exams. Part 1.

Alright, alright!

I know this is the third time I’ve posted this week. It seems I’m full of energy after the Christmas break. I really needed that break, didn’t you? Anyway, happy to go back to teaching, but hanging ominously over my head like a black cloud about to burst is the pressing necessity to start training my students to take their standardized speaking exams which will allow them to promote to the C1 (advanced level).

For those of you who are not familiar with the exam, let me explain how it goes. You might find you can apply it to your own classes, even though it’s not exactly the same kind of exam.

There are two tasks in the speaking exam.

  • Part 1: examiner-led conversation. The examiner asks questions about a topic and the students give full answers.
  • Part 2: the monologue, where the students are given a set of pictures (normally two or three).

About Part 2

In this second part, the one this whole post is built upon, the student is offered two or three colour photographs. Normally, the photos are in contrast or represent different options of the same issue.  Also, there is a title or a statement which suggests the topic of the monologue. After some thinking time, normally a couple of minutes, the student is given the opportunity to speak for about 4-5 minutes without interruption.

At this level, students are expected to talk about the topic using a wide range of vocabulary and grammar structures and they will have to compare and contrast the pictures talking about the most important issues related to the topic.

Students face different fears when preparing for the oral exams. Some of them are:

  • Do I know enough specific vocabulary?
  • Will I be able to use a variety of structures or will I stick to the simple subj+verb+complement structure?
  • Now,  the topic is “food”?  3 or 4 minutes talking about food? Seriously?  For heaven’s sake, I cannot even talk for one minute, let alone three or four!

Vocabulary and ideas. Keywords here.

How I train my students. Topic: Food

This is how I help them step by step. Bear in mind this is the first post of a series of posts dedicated to training students to pass the oral exam. As students gain confidence, guidance will be less necessary and some of these steps will be either unnecessary or done by students as part of their learning process.


1. Brainstorming vocabulary. Learning progresses through prior knowledge, so tapping into students’ prior knowledge is an essential part of learning.

On the board, we brainstorm the vocabulary they already know. This is an important step because it helps students reinforce and bring to life the vocabulary studied in previous courses.

Then, I ask them some very simple questions where they can activate this vocabulary: What’s your favourite food? What is the most expensive restaurant that you have ever been to? What did you eat there?


2.Acquiring new vocabulary. We work on new vocabulary using a number of written and oral exercises. (Any good course book provides enough vocabulary input, at least to get started). It’s important to emphasize here the importance of learning words in chunks. Surely, you can teach the word “ obesity” on its own, but there some other words you really want to teach in collocations like, for example, “eating disorders” or to “be obsessed with”. Also important, essential I should say, is pronunciation.


3.  Getting Ideas. Reading and Speaking. More often than not students find it hard to think on their feet. They find it difficult to come up with ideas that will fill in the 3 or 4 minutes allowed for this part.

You might disagree with me here, but I always tell them that oral exams are like the rest of the exams they might take. They need to prepare. They need to study.

Lack of preparation might result in something I’ve seen very often when assessing oral exams; students might talk for one minute and then, suddenly, stop. Now, you might wait patiently for them to come up with something else but the truth is that very often, when prompted to continue, they just repeat the same ideas they have already used. Why? most of the times due to lack of preparation. They mistakenly think that they don’t need to study for oral exams. They do.

So, listen up dear students! You need to study for oral exams.


Reading about different issues related to the topic not only reinforces the vocabulary they have learnt and gives them a chance to see it used in context but also gives them ideas of what they can talk about when doing the real task.

I normally use short extracts from The Pais in EnglishHere’s my choice of extracts for the topic of food. This how we do it:

  • We read the extracts in class or set the reading task as homework.
  • We underline relevant vocabulary.
  • Students discuss the questions in pairs, followed by class discussion.


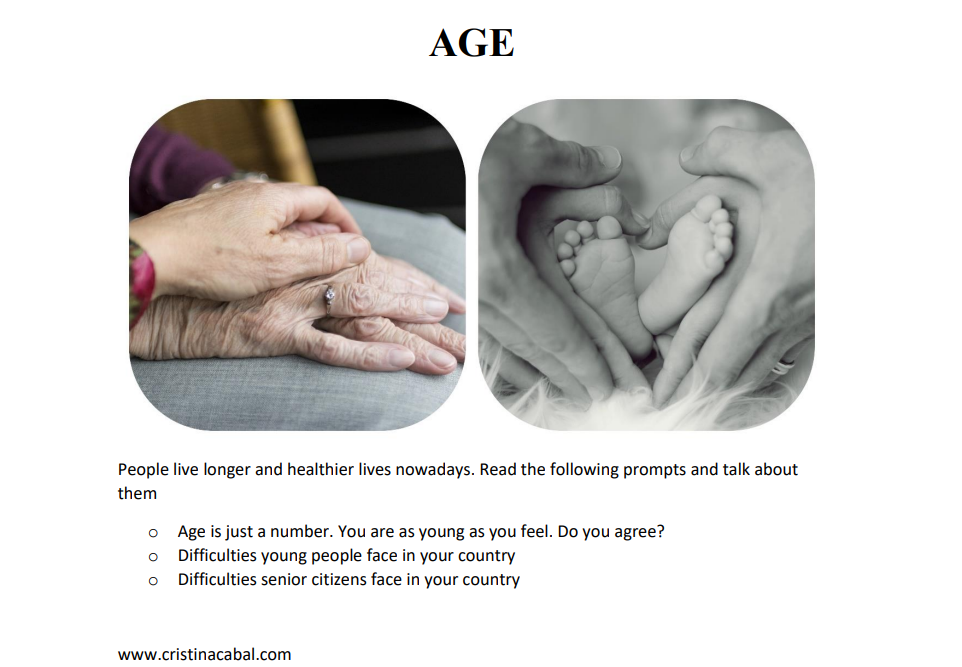
4. The pictures. I am lucky to have a computer and an overhead projector in my class, so I normally display a collage with two or three related pictures on the board. You can see the ones I have used for this topic here and here.

Together we read the title and brainstorm ideas to fill in these 3 or 4 minutes. This step should be easy now as we have previously discussed some ideas in the previous task. Some ideas could be:

Together, we brainstorm vocabulary

  • Pesticides
  • Label
  • To be obsessed with
  • Bulimia
  • Fats
  • Proteins
  • Carbs
  • …etc

  1. Tips.
  • Look at the pictures and the title if there is one. It will hint at what you need to talk about.
  • If you are given some thinking time, use it.
  • Remember that you are not asked to describe in detail what you can see in the pictures. You are asked to compare and contrast the pictures talking about the topic.
  • Focus on three or four ideas and develop them as much as you can without repeating yourself. Start with a short introduction about the topic, talk about the first idea, develop it; start with the second idea and repeat procedure.
  • Don’t forget to use specific vocabulary and a variety of structures.
  • Essential: practise a lot and record yourself taking the exam.

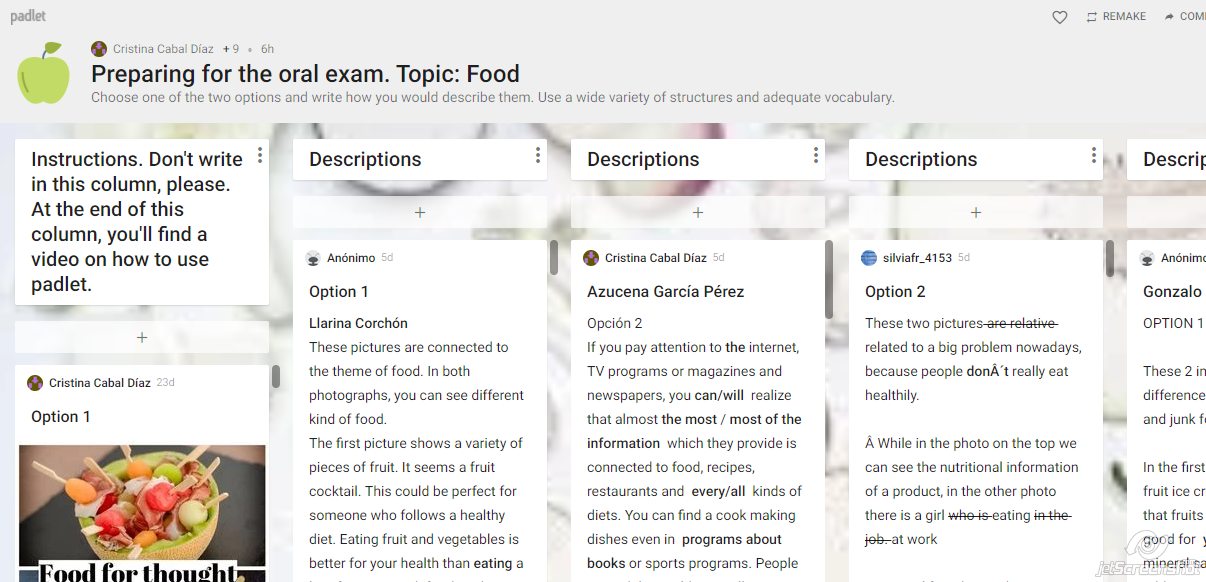
6. Homework. Further practice. Collaboratively writing on a Padlet.

This follow-up task has two main aims:

  • to reinforce acquired knowledge and strategies
  • to share ideas. By asking students to write on a  collaborative Padlet, they benefit from each other and see other ideas which might help them improve their own performance.

All the Padlets created for this purpose will then be shared in a single one where students, at a glance, can decide what topic to revise.

In the next post, we will move from writing to speaking on a Padlet.

Blog de Cristina is also on Facebook. Follow us

Oral Exam: Monologue Based on One or More Pictures. Some Tips and Ideas to Get Started

In the intermediate and more advanced exam you will be presented with one, two or more pictures about the same topic but in clear contrast. It’s important to remember that you are not supposed to give a detailed description of everything that is happening in the picture(s). On the contrary, what is important is that you talk about the topic or idea suggested in the picture(s). If you are given  for example 3 minutes to talk, use just one minute of this time to describe in general, using appropriate language and structures; the rest of the time should be dedicated to talking about the topic and giving your opinion.

BEFORE THE EXAM

  • Make a list of the most common topics asked in the exam.
  • Brainstorm vocabulary you can use related to this topic. Mind mapping works perfect here. I use the free site Goconqr.

Mapa Mental creado con GoConqr por Cristina Cabal

  • Practise using sets of pictures in contrast. You can use my own selection here. (Scroll down)
  • If your problem is that you never know what to say, I suggest you have a look at some conversation questions you might be asked about the given topic. It will probably help you get started. Have a look at some common topics with questions here.
  • Listen to other students taking the exam (for example here) or read some examples here (fashion, global warming, jobs, new technologies and food)
  • Time yourself to control the time it takes you to develop your ideas.
  • Record yourself and then listen to the recording and see how you can improve it. You can use the app Soundcloud, which allows you to stop the recording and write comments.

(You can write a comment on a track through the text box below the waveform that says ‘Write a comment…’ and press your return or enter key to send. The comment will appear at the point on the waveform where you first started typing. Alternatively, you can click any free space in the comment section to leave a comment at that specific point)

  • The day before the exam, revise all the topics and the vocabulary you can use.
  • Half an hour before the exam, don’t speak your mother tongue. Spend the time listening, doing some silent reading or pronunciation exercises in English.

DURING THE EXAM

Before you start speaking:

  • If you are allowed 1 minute to organise your ideas, use that minute. I have often seen candidates not taking this minute and making a mess of the exam just because they didn’t take the time to organise their ideas.
  • Scan the pictures and identify the topic. Sometimes there is a title or a heading that helps you.
  • Try to come up with three ideas about the topic suggested by the pictures. Expand on these ideas.

Taking the exam:

  • Begin by giving an overall idea of what the pictures are about, using a variety of structures, modals to indicate possibility and the useful “look” or “seem”.
  • Talk about the topic. It’s easier if you relate it to yourself, but if you don’t have this experience, talk about a friend’s or just lie. This is an English exam, not a lie detector.

via GIPHY


  • Develop your ideas. Try to use linkers to connect your ideas.
  • Don’t give too complicated explanations. I’m sorry to say, you’ll probably make mistakes.
  • Give your opinion. Say which one you prefer and why.

Some expressions you can use:

Remember it’s better if you start by giving a general idea of what the pictures are about.  Don’t start like this:

In the first picture I can see

Start like this:

  • In this worksheet there are two photos. They both show different ways of (shopping).
  • These photos are clearly both connected to the topic of (science)… but in two quite different contexts. In the first one… In contrast, the second picture shows…
  • The photo/picture shows …
  • The first thing that strikes me about this picture is…


Remember that you are describing a picture, so you cannot be 100% sure of what is happening. Use language that suggests this:

  •  I think…
  • Maybe / Perhaps…
  • I guess they are…
  •  Modal verbs of deduction: she must / can’t /
  • Modal verbs of possibility: could, may, might
  •  She looks/seems… (tired)/ She looks like … (a teacher). It looks/seems as if (it’s raining)

PRACTICE.

Go to https://www.cristinacabal.com/?page_id=4906  and scroll down to the section SET OF PICTURES FOR PRACTICE and just “practise”. “A  lot!” 🙂