Tag Archives: methodology

Teaching Collocations: a Low-Prep Activity

I am almost embarrassed to share this super easy lesson plan with you, but right now I am in the middle of a love affair with collocations and all my classes, no matter the level, are working  with collocations.

Please, don’t freak out! I am not going to give you an obnoxious list of collocations and ask you to learn them by heart. That’s not the way I do things!, but you’ll surely agree with me  that there is no point in learning the adjective “interested” if you don’t know that it’s followed by the preposition “in”. Yes, Ok, you can say “I’m interested”, but that’s it!! And we are aiming for a bit more, aren’t we?

(at the end of this post, you’ll find  some interesting links to learn more about collocations)

So, take a deep breath and follow me!

Step 1. What is a collocation? Though students don’t really need to be familiar with the term, it might be a good idea to introduce the concept.

In English we can say I absolutely agree but we cannot say I absolutely go; we can say I am interested in, but not I am keen in. We can say a heavy drinker, but not a strong drinker or a  chain drinker. These conventional combinations of words, chosen naturally by the English speakers to express an idea, are called “collocations”.

Below you’ll see some of the collocations I am going to use, but this activity will work with any collocation:

Depend on/ interested in/ arrive in/ arrive at/ fed up with/ spend on/good or bad at/ close to/fond of/keen on/ look forward to…etc.

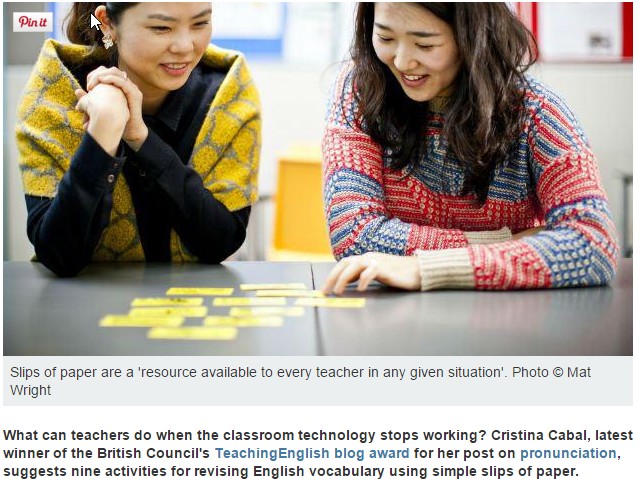
Step 2. Slips of paper. Oral activity.

  • Select the collocations to be studied, as many as students you have in the class. In my case, I have decided to give them dependent prepositions with common adjectives and verbs because I have noticed they always make mistakes here.
  • Write the adjective or verb on the slip of paper and on the back of it, the preposition(s) it collocates with. Stand up in the middle of the class for everybody to see you. Show students the slip of paper containing the adjective or verb and ask them to guess the missing preposition, and then give you a sentence containing the collocation.
  • A small competition. Divide the class into two groups and repeat procedure. This time, groups will need to guess the preposition and give a sentence -different from the one they gave in the previous stage- to win the point.

Step 3. Slips of paper. Writing activity.

  • Give every student a slip of paper from the previous activity and ask them to individually think of a question to ask their partners containing this collocation.

Offer help if necessary.

Step 4. Speaking activity using the speed-dating technique.

Students sit facing each other. Some students will remain seated during the whole event (in real speed dating, women remain seated). They have 4 minutes to talk asking and answering the question they have written containing the collocation. Then, a bell rings and “men” need to stand up and move to their right to start a new conversation and the whole process is repeated again. I didn’t have a bell so I used a Class Timer (here).

A highly engaging activity your students are likely to enjoy!

Useful links to learn more about collocations

Blog de Cristina is also on Facebook. Follow us!

Thanks for reading!

Lesson Plan: Are you a Risk Taker?

In this engaging series of activities students will discuss different actions that involve taking risks. It aims at developing students’ communicative, listening and writing skills through the acquisition of new vocabulary.

Level: advanced

Time required: 60 minutes

Materials: handout 1 and handout 2

Warming up: The video

  • Do a quick survey asking students: Do you enjoy taking risks?
  • Play the first 55 seconds of the video and pause it. Ask students in pairs to discuss what they would do in this situation. Get feedback. Ask the class as a whole to predict what might happen to the people who decide to run the risk and take the two empty seats.
  • Play the video until the end. here

Step 1. Speaking based on visual prompts

  • Class as a whole. Ask students: What’s the most dangerous thing you’ve ever done?
  • Put students in pairs. Tell them you are going to show them different activities that involve taking risks. Ask students to discuss whether they would be willing to try them or not, giving reasons for their choice.

Powered by emaze

Step 2. Working with vocabulary .

  • Put students in pairs and ask them to write, in two minutes, words related to taking risks. On the board, write their suggestions.
  • Give them handout 1. Focus on any new words/expressions.
  • Prepare slips of papers with the new vocabulary and follow the steps given for activity number 4 in the article “Nine ways to revise vocabulary using slips of paper”.


Step 3. Speaking. Using new vocabulary.

We all know how difficult it is for students to introduce  new vocabulary when they speak. This activity aims at encouraging students to use new words.

Step 4. Listening Comprehension

Tell students they are going to see a video about parkour. Hopefully, students will remember what parkour is, as they came across this word at the beginning of the lesson.

  • Link to the activity here.
  • Direct link to the video here


If you are running short of time, you can always set this activity as homework.

Step 5: Writing

Ask students to write a “for and against essay” on one of these quotes

  • “To know what life is worth you have to risk it once in a while” Jean- Paul Sartre
  • “The biggest risk is not taking any risk”-Mark Zukerberg

Tips on how to write a for and against essay” in the Writing Section of Blog de Cristina.


Nine Ways to Revise Vocabulary Using Slips of Paper

In today’s post I would like to share with you the link for an article I wrote for the  British Council’s magazine, Voices. As a result of winning this month’s  TeachingEnglish blog award with my article on pronunciation  Most Common Pronunciation Mistakes Heard in Oral Exams I was kindly invited to write a new article for their magazine.

Here’s the article Nine ways to revise vocabulary using slips of paperwhich I hope teachers will find useful.

Blog de Cristina is also on Facebook. Click to follow!


An Engaging Combination: First-Day Introductions+Indirect Questions + Concentric Circles Technique

Last week was crazy. No lessons yet but lots of tests to be marked and tons of red tape to go through. So, I am shockingly super excited about beginning a new course; yes, excited about getting up early and teaching non-stop for six hours and   no…  I did not trip and fall  into a bucket full of cider   😉 (typical drink where I live).

First days are for introductions and little more, but  this year I think I am going to kill two birds with one stone  and combine introductions and some grammar that needs to be reviewed. So, I have got this idea in mind of asking students to introduce themselves to each other using indirect questions. I hope most of my new students will have, at some point over the years, studied  with me and for the rest, I will have to find a way to deal with the OMG- shocked looks I am sure I am going to get. But let’s cross that bridge when I come to it!

Blog de Cristina is also on Facebook. Click to follow!

Level: Intermediate and Above

Time Required: 30-45 minutes

Description of the Activity .This engaging activity has been designed as a  first-day oral introduction activity and to teach/help students revise how to make indirect questions . I will use the concentric circles  technique,  which is a mingle activity .The technique is explained below and I have also published a picture of my students doing the task.

STEP 1.Revision of Indirect Questions.

Indirect questions were studied last year, so we will just do a quick revision with this webiste I have created using AI. Click here  or on the image


If necessary, we will spend some minutes brushing up in two different ways

  1. Doing some online exercises you can find here  or , here  or if you do not have a computer, you might want to photocopy this worksheet here
  1. Orally producing some questions and asking students to provide the indirect question.

 STEP 2. Writing .

Ask students to write a question they would like to ask their classmates. For example: ” Do you speak any other languages?”, “Where do you live?” or “How long have you been studying English?”.

Give students slips of paper containing the beginning of an indirect question and ask them to make sure they know how to ask their question beginning with the phrase on their card. Cards here. (template downloaded from Teknologic). For example : “Can I ask  you where you live?” or “Would you mind telling me how long you have been studying English?”. 

STEP 3. Explaining the concentric circle technique.

This technique is a kind of mingle. Although mingles can be a bit noisy  and a bit disorganised, most students love it.The distinctive feature of a mingle activity is that all the students work simultaneously and switch from one classmate to another while speaking. Mingles allow constant repetition and this raises students’ confidence in their use of English.

Students arrange themselves so that they are facing each other in two circles. The inner circle faces out, the outer circle faces in, so that each participant has a partner that they are facing (Note: If the group has an uneven number of people, the teacher should participate in the circles). Each student from the outside circle, after speaking with the person facing him or her, moves one step clockwise to speak with a new classmate from the inside circle. I would suggest asking students to switch partners every four minutes for this activity. This concentric circle technique can very well be adapted to talk about any given topic of discussion. Encourage students to elaborate on their answers and use targeted language structure.

STEP 5. Speaking.

Students introduce themselves to the person they are facing and then ask their indirect questions making conversation with their partner. After four minutes, call time and rotate for the next question, forming a new partnership.

The conversation might go something like this:

  • Student A: Hi, I’m (student’s name)
  • Student B: Hello, my name’s  (student’s name)
  • Student A: Can you tell me how long you have been studying English?
  • Student B : (answers the question giving as many details as possible)
  • Student B : Can I ask you a question now? Would you mind telling me why you are studying English?
  • Student A: Answers

Teacher  says :”  Rotate” and students from the outside circle move one step clockwise to speak with a new classmate from the inside circle.

Model an example of a conversation with a student.

Stop the activity when they have had a chance to speak to most students.


Introducing Question Tags Using What you Know about your Students

Introducing, Understanding and Using Question Tags

I don’t know about you, but I have like 15-20 students per class. This number suits me fine as it allows me to do plenty of activities which require group work without students feeling the class is too crowded to interfere with academic success. At the same time, this number of students also gives me the chance  to get to know  my students quite well, even know some personal details about them, which are going to prove useful to  introduce question tags in an easy way.

Aim: Introducing , Understanding and Using Questions Tags with a Falling Intonation

Level : B2

STEP1. Introducing. Surprise your students by producing some statements about their lives. Make sure your intonation is falling as we are just checking something we already know.

  • Esther, you are a nurse, aren’t you?
  • Felix, you have been to  France several times, haven’t you?
  • Isabel, you spent your childhood in France, didn’t you?
  • Laura, you aren’t married, are you?
  • Carlos, you don’t work in a bank, do you?

At this stage, students are on tenterhooks waiting for you to say something about each of them so you have all their undivided attention. While I would say the first sentences  containing the tags in a normal way, for the last ones I would emphasize the question tag so that they realise something is going on.

Step 2.  Understanding. Focus on meaning/form/pronunciation.  At this point , some students would have probably  asked the question  “When do you use them? “Tell them you use  question tags with a falling intonation when we are sure of the answer, so the question tag here is not a real question (meaning). With the students‘ help , write some of the previous sentences  on the board for students to infer the rules (form). Focus on intonation now, making sure all the students have had a chance to do enough practice before we move on to the next step (pronunciation).

Step 3. Using Question Tags

♥Controlled Practice. Now ask students how much they know about you and ask them, in pairs, to write some facts they think they know about you. Students tend to write positive sentences, so encourage them to write negative ones, too. Once they have written their sentences about you, point to the board where hopefully the rules will still be displayed and  ask them to write  the question tag  .

Stundents take it in turns to  read  their sentences aloud asking for confirmation (gently correct if necessary) and the teacher answers accordingly.

  • Cristina, you worked in EOI La Felguera some years ago, didn’t you?  Yes, I did.
  • Cristina, you don’t eat meat, do you? No, I don’t. I’m a pescatarian.

At this stage, it is important to teach students how you answer to a question Tag.

If you answer  Yes, do not use contracted forms.

If you use No, contracted forms are possible.

  • Yes, he is.
  • No, he is not./ No, he isn’t/ No, he‘s not

♥Freer Practice. Students, individually now, write five facts they think they know about their partner using question tags.  Allow 5 minutes  for this step helping students with vocabulary and questions tags. Students carry out the speaking task in pairs. The teacher monitors, promts and corrects gently.

Question Tags Grammar Handout here. (black and white version here)