Believe me, they don’t have to be boring. In fact, just the opposite.
I know some teachers consider translation activities a thing of the past and that, arguably, they should be banned from our classes. I don’t completely agree.
If I am honest with you, I can’t say that I like giving students a whole paragraph to translate, but a one-sentence translation exercise can help consolidate and reinforce grammar and vocabulary.
And it doesn’t need to be boring. In fact, it can be a lot of fun. How?
Easy. Let’s combine a seemingly boring traditional exercise with an online fun tool and let’s turn it into a competition.
Preparation:
• Decide on few sentences you want students to translate. I’d suggest 6-8 sentences. If you like exploring tools, my favourite for this kind of activities is Playbuzz flip cards.
• Slips of paper
How to go about it:
1. Pair learners and give them as many slips of paper as sentences you want them to translate.
2. Write the first sentence on the board and ask students to translate into English. If you use the online tool I mentioned above, just show the first card. (See mine below)
3. Depending on the length or difficulty of the sentence to be translated, set a time limit.
4. Once the pair have their sentence, ask them to write it on the slip of paper big enough for you to see from a distance.
5. When the time is up, ask the pair to hold it up and quickly go through all the translated sentences awarding 1 point to the pair who has the correct translation.
6. The winner is the pair who get the most points.
Note: Be strict with spelling mistakes or any other tiny mistakes. Students love it when you are strict and don’t give away the points easily.
Follow-up: Revise again all the sentences, but this time orally.
Education is the most powerful weapon you can use to change the world- Nelson Mandela
I’m so excited. Truly. I am. It’s been months since the last time I taught a class full of students. I know it’s going to be hard but I’m really willing to get back in the swing of things. I’m also preparing material for my workshops, and I have a bunch of work to catch up on, but I’m anyway feeling really motivated. So, it seems I am off to a good start.
This isa lesson for upper- intermediate students (B2) about education. In this post, you will find
Some vocabulary you might need to revise/learn when discussing this subject.
A small challenge with some confusing terms related to education
A video about 6 problems of our education system
Speaking practice: questions to discuss
A written assignment
The warm-up. Setting the context
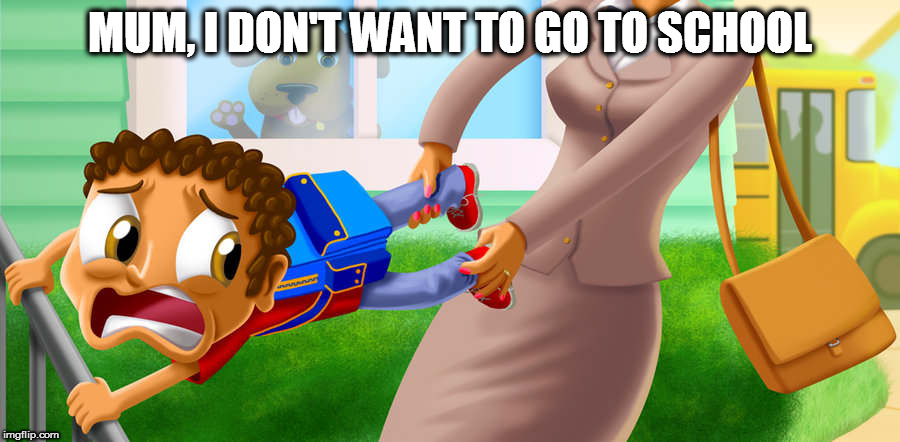
I don’t think there is a better way to introduce a topic than by showing students a picture that will probably spark interest and hook students into the lesson. That’s the aim of the picture below.
Show the picture and listen to student’ reactions. Probably, the first one would be “Me, neither”, but let’s dig in for more profound reactions.
Tell students to get into pairs and think of three reasons why this boy wouldn’t want to go to school. Allow them 2 or 3 minutes and the write their suggestions on the board and discuss them.
Ask students: Can you relate to the boy in this picture? What can you remember about your kindergarten? In your opinion, what’s the ideal age to start school?
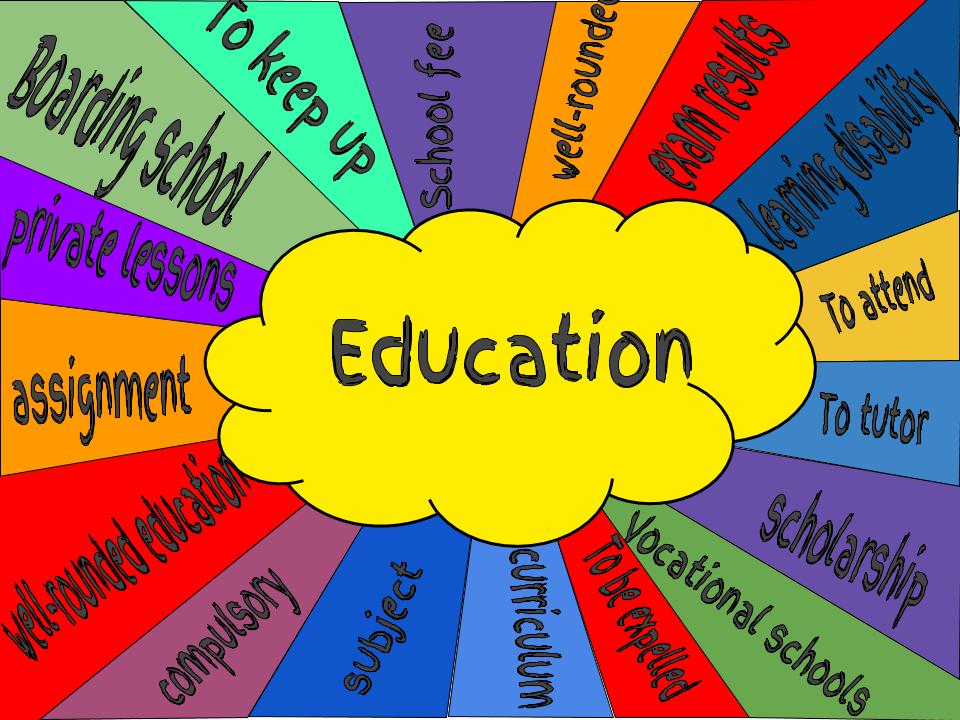
The vocabulary
Ask students to work in pairs. Write on the board the word “education” and ask students to brainstorm vocabulary related to the topic. Encourage them to mind map to help them revise vocabulary related to this thematic area. Allow them some minutes and get feedback from the whole class. I gave handout 1 to my intermediate students last year, so this year (B2), I will probably need to revise and add the terms in handout 2 explaining difficult vocabulary.
The challenge.Did you know?
In this part of the lesson, students are presented with some confusing terms.
Ask them to work in pairs and discuss the questions posed in the flip cards. Award 1 point to the student who has guessed the right answer. Flash Card Deck created by Cristina Cabal with GoConqr Speaking. The questions.
Ask students, in pairs or small groups, to answer the following questions about education, where they will revise some of the vocabulary learned in the previous step. Encourage the use of new vocabulary.
You can get the PDF with the questions here, but isn’t it more appealing to use the Spark below.
Listening. The video: 6 problems with our school system.
Methodology: collaborative retelling
It is a longish video. It lasts almost 6 minutes so I’d suggest breaking it up and asking students to work on different parts of the video. In the video, 6 problems with our education system are mentioned.
This activity will be set as homework.
Introduction. In class, play the first 34 seconds of the video and tell students to give you a summary. They will probably say that the video shows how our system of education has become obsolete and is not preparing children for the real world. Ask them whether they agree with this idea.
2. Homework.
Explain that everybody will need to listen to the introduction again (first 34 sec) which summarizes the content of the video.
Tell students the video talks about 6 problems our current education system is facing nowadays.
Form groups of six students and tell them that, in the next lesson, they will be working in groups of six and each of them will share what they have learned about their assigned problem and their opinion on whether this is a real problem in their country providing examples, if possible.Alternatively, you can form groups of 3 students and assign each student two problems.
Assign tasks to the different students in the group
Student 1: Industrial Age values 0:35-1:26
Student 2: Lack of autonomy 1:26-2:18
Student 3: Inauthentic learning 2:18-3:12
Student 4: No room for passion 3:12-4:15
Student 5: Differences in how we learn 4:15-4:40
Student 6: Lecturing 4:40-5:56
Writing. An opinion essay.
Write an opinion essay on the following:
Our current system of education is now outdated and ineffective.
Here’s a nice post I wrote last year which might help you.
I must have been in my teens, but I vividly remember my mother telling my father that someone called James Dean had called. The funny part was not only that the famous now-long- deceased actor had phoned my dad, but the way everybody pronounced his name, /jamez dean/, as if it was the most natural thing in the world, while me and my naughty siblings couldn’t help cracking up, repeating /james dean, james dean/while in stitches. (The Spanish pronunciationof the “j” is similar to the Scottish word “loch” or the German word “Bach”)
In case you are wondering, my parents (now almost 80) had never ever heard a word in English so everybody said /james dean/ just like that and never gave it a second thought. We, me and my three siblings, just liked fooling around. I know better now!! 🙂
About the lesson:
This lesson, aimed at B2 students and above, has two parts
Part 1: students discuss their names: video+ questions and some follow-up conversation questions
Part 2 : they talk about their personality through some engaging activities.
There is a bonus activity for those students who want to go the extra mile: a beautiful quiz with similes of the tyep: as free as a bird.
Part 1. Talking about your name
A video-based listening activity
Tell students they are going to watch a short extract from the Graham Norton show, where the actresses Meryl Streep and Nicole Kidman discuss their birth names. Play from 0:00 until 2:50.
Introduce:
To be named ( after someone)
To name someone
A pet name
A middle name
A nickname
Procedure:
Play the video once and ask students some comprehension questions. Play the video a second time if necessary.
Meryl Streep was named Mary at birth. How did she end up being called Meryl?
Is she happy about her surname? How does she wish it to be different?
Why is Nicole Kidman called Hokulani? Who is she named after?
Follow-up Discussion questions:
Are you happy with your name? Why (not)?
Does your name have a meaning? If so, what does it mean?
Do you have a middle name? What is it?
Do you have a nickname? If so, what is it and how did you get it?
If you could change your name would you? What would it be? Why?
U2’s lead singer, Bono, called his daughter Memphis Eve and Gwyneth Paltrow’s daughter is called Apple. Do you know any “normal people” with unique baby names? What about you, do you prefer giving your child a more traditional name or a unique name?
In some countries, when women marry they take their husband’s last name? What do you think of this?
Part 2. Talking about your personality
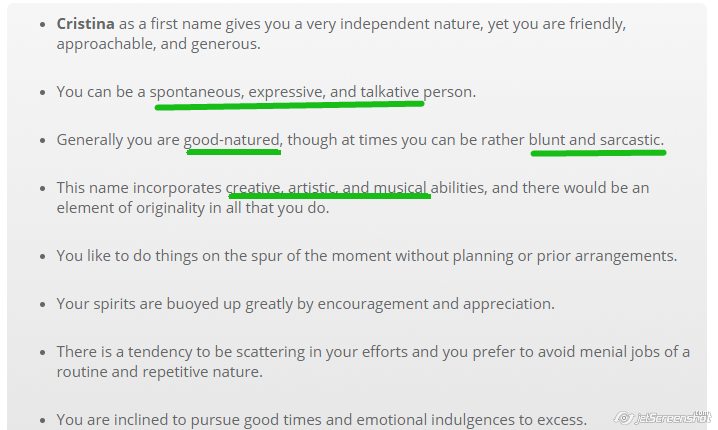
In this second part, we are going to revise and learn some more complex personality adjectives. To introduce personality adjectives we are going to use a website which analyses your personality based on the numerical value of your name. Whether students believe in it or not should be irrelevant, we are only interested in language acquisition here.
The warm-up
As this lesson is aimed at upper-intermediate students and above, students will have some prior knowledge of the most common personality adjectives, at least enough to get them started.
Ask students whether they think a name can shape their personality and refer them to this website where they’ll have to write their name in the space provided and read about their personality.
You can always ask them to read their horoscope, but this is “old news”, so I thought this might better spark students’ interest.
At home, students go to the website and find out about their personality based on their names. They look up any new words they don’t know, especially personality adjectives, as they will need to share this analysis with their classmates and say whether they agree or disagree with it, giving reasons.
3.Gathering Feedback: on the board or using a digital tool. Your choice
This activity can be done in a traditional way i.e board and chalk. Students call out an adjective and you write the personality adjective on the board.
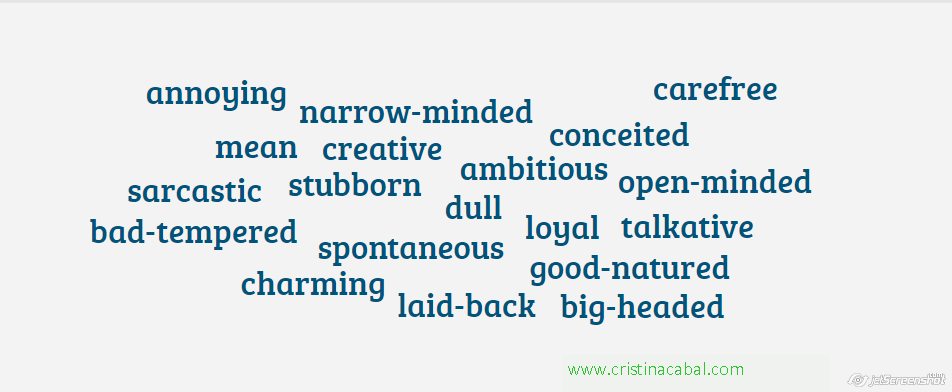
Again, with the aim of creating a more engaging activity, I’m going to use a free online tool called “Wooclap” to get instantaneous feedback. The tool is very easy to use, it has a very friendly intuitive interface making it very easy to use, even for those teachers who are not too tech-savvy. The app takes students answers and creates a word cloud that can be exported or embedded. Students will need to use their own devices but, if necessary, every three students can share one.
Once you have created the word cloud in Wooclap, use the overhead proyector to display it and ask volunteer students to explain the meaning of the adjectives and say whether they think it is positive, negative or neutral.
Below, an example of a word cloud created with Answergarden.
4. Speaking
Put students in pairs and ask them to share their name report from the website and say whether they agree or disagree with such analysis.
Ask them to discuss the following questions.
What kind of people do you usually get along with?
What kinds of personality traits do you hate?
Is your personality more similar to your mother’s or father’s?
Do you think we are born with our personalities, or do we develop them because of what happens to us?
Do you tend to fall in love with good looks or with a great personality?
Does one person’s character affect the personalities of the surrounding people? Are you influenced by anybody you know?
Does birth order affect personality? What qualities do a first-born child, a last-born and an only child have?
Going the extra Mile? A challenging Quiz
The Quiz: As Free as a Bird.
Let’s go the extra mile! In this quiz, you’ll find more colourful ways to talk about someone’s personality. In order to learn them, I suggest taking the quiz two or three times, the last time checking if just by looking at the picture students can remember the simile.
After doing the quiz, you can always ask some follow-up questions like:
Admittedly, I’m in sore need of a respite from the pressure of end-of-the-course classes, but it’s also true that I have a lot of ideas to try and share sitting on the drafts shelf of my mind. Little by little they will see the light.
My students struggle with English spelling. Who doesn’t? Little by little I can see they’re making progress, but unfortunately there are some spelling mistakes that I keep finding in my student’s exams. A quick search on the Internet reveals that the occurrence of these spelling mistakes has little to do with your mother tongue though, admittedly, the quiz is based on my students’ spelling mistakes who are, for the most part, Spanish.
What about you? Do you also make these mistakes? Let’s find out!
Some orthodox and unorthodox techniques to get rid of these spelling mistakes
Write them down. This is the dull, traditional but effective way of correcting spelling mistakes. Start with one mistake and write it down, at least 10 times. This was my mother’s favourite method. I guess it served two purposes: to help us learn the correct spelling and also to keep us quiet for a while. I can’t blame her. I have 4 siblings and there are 6 years between the youngest and the oldest.
Do the quiz. Do it once and write down all the targeted words you can remember. Take the quiz again. Correct the ones you misspelled. Repeat procedure.
Ask someone to help you. Write a list of the words you have trouble spelling. Write the translation in your own language next to each one. Ask someone in your family to call any of these words at random. Write them down and ask this person to correct them. Once you have mastered the spelling of the words, you might want to buy your helper a drink. He deserves it.
Write a short story. Write the words you seem unable to spell correctly. Make sure you write them down properly. Read them several times. Write a short story containing them and give yourself a high five if you got most of them right. Warning: don’t ask anybody to read it. The story will probably not make any sense at all.
Stick on the wallsof your house flashcards with the correct spelling. I used to do it with phrasal verbs when I was at uni. It worked but my flatmates were not very happy.
Use Quizlet or any other app to create flashcards. This app is great to work with spelling as it offers a variety of games to practise the correct spelling. I’ve made a short video tutorial. See it below.
Do your students sometimes feel as if they are not making enough progress? Do they sometimes have the impression their language learning has slowed? Do they feel they are stuck in the intermediate plateau?
While this feeling is completely normal, it can sometimes be very frustrating for our students. You might try to explain to them that this is just part of the natural process of learning a language, but the truth is that in their eyes, they are just not progressing as fast as they think they should, no matter how hard they try. It’s true that this perception is not real, but it never hurts to show them how unreal it is.
Today I want to share with you a little experiment I did with my students. Very simple, but very effective too. I did with my intermediate students, but you can easily try it with students of any level.
What’s the aim of the experiment?
to make students aware of how much they have learned at the end of a topic-based lesson. The idea is to brainstorm vocabulary related to the topic twice: at the very beginning and at the very end of the lesson(s) to make them realize how much they learn in the course of a single lesson. Making students aware of how much they are learning can dramatically improve teaching effectiveness as it is a powerful way to boost their motivation.
How long does it take?
5 minutes at the very beginning of the lesson and five more at the end of it. If you dedicate two or more sessions, 5 minutes at the beginning of the first session and 5 minutes at the end of the last one.
Do you need to use technology?
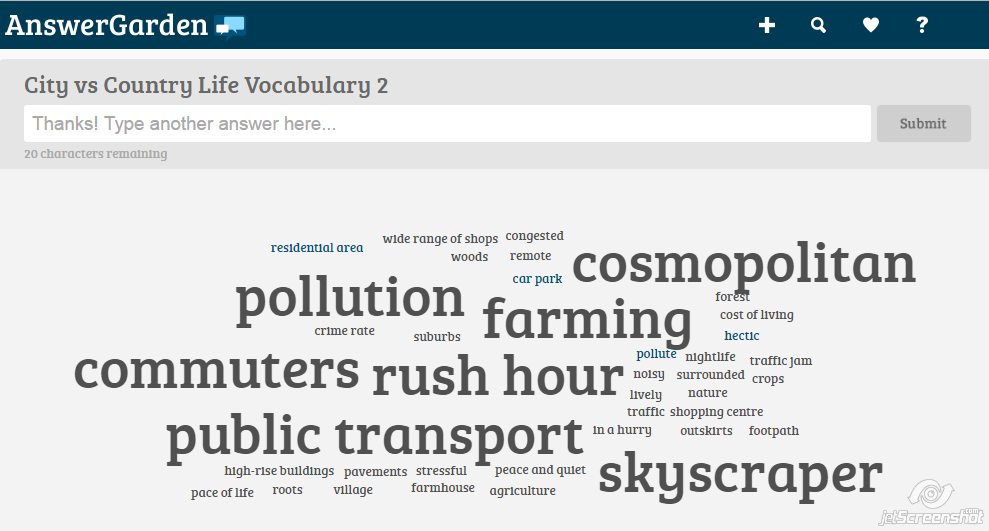
I am afraid you do. For this experiment, students need to use their mobile phones with internet connection or any other device with internet connection. The good news is that you just need one device every three or four students. I have also used Answergarden, which is a very simple free tool used for getting real time feedback from a group. It’s really very easy to use, but if you think you need extra help, you can watch a video tutorial in Teachertrainingvideos.com or read a brief tutorial here.
THE EXPERIMENT
Go to Answergarden and create a New Answergarden (it literally takes less than one minute). In my case, I created an Answergarden with the title City Life vs Country Life as this was the topic we were about to study in class.
Ask students to work in pairs or in groups of three and use just one mobile phone.
Share the link with your students and ask them to type the url in their devices (as I have mentioned, my students used their mobile phones) You can use Google shortener to shorten the link.
Ask students to brainstorm vocabulary related to “living in the city and living in the countryside”, enter the vocabulary in the box and carefully check the spelling before submitting their answers. Allow 2 or 3 minutes.
Display on the overhead projector the answergarden. As students submit answers, click the Refresh tab on the bottom menu to update the answer display.
(below you can see the first wordcloud)
Go through the vocabulary they have submitted and make sure you save this first word cloud.
Teach vocabulary as any other ordinary day
Repeat procedure at the end of the lesson or the sessions dedicated to this topic.
Display both clouds and ask students to compare them and reflect on how much they have learned on the course of a single lesson. Contrasting both word clouds will undoubtedly not only motivate your students, but also will reinforce the idea of progress that is sometimes lost especially at the intermediate level.
Another idea with the same aim would be to ask students, at the end of a unit, to write everything they have learned in this unir. They’ll be just amazed at how much progres they have made.