Tag Archives: exam

The Two-Corner Technique. How I Train my Students to Pass the Standardized Speaking Exam.Part 2

It’s Monday. I swear it was Friday when I last blinked. Exam time is inching closer and closer and I figure it’s about time I share part 2 of how I prepare my students to take oral exams. Please, note that attending classes and piling up dozens of photocopies helps, but this alone does not guarantee you are going to pass the exam. Practice. Keyword here.

In Part 2, you are going to read about the two-corner technique and the websites  I use to help my students gather ideas.

The anecdote.

What I am going to relate here is one of the reasons why I try to offer my students not only vocabulary and structures but also ideas. Yes, I present them with different ideas, but  I don’t ask them to study and use them as if they were theirs, I ask them to discuss them. Why? Mainly because by discussing ideas they can develop their own, acquire some others and also learn to challenge opinions they do not agree with.

You have probably heard students, or experience if you are one, talk about this fear of not knowing what to say.

Only last week I set a writing activity to be done in class. I asked students to write for about 20 minutes giving their opinion about a topic we had already discussed in class.

I observed one of my students was not writing but staring into space. After 5 minutes, I approached him and asked why he wasn’t writing. He said he could not come up with any ideas, said he wasn’t inspired and that he was afraid this would happen on the day of the exam.

And I worry. Even though my students study hard, sometimes they find it hard to think on their feet and start talking or writing.

It’s with this in mind that I try to provide my students not only with grammar and vocabulary but also with other people’s points of view on a given topic so that they can discuss these ideas and develop their own arguments. Speaking is not only talking about what you would do but also about what you wouldn’t do.

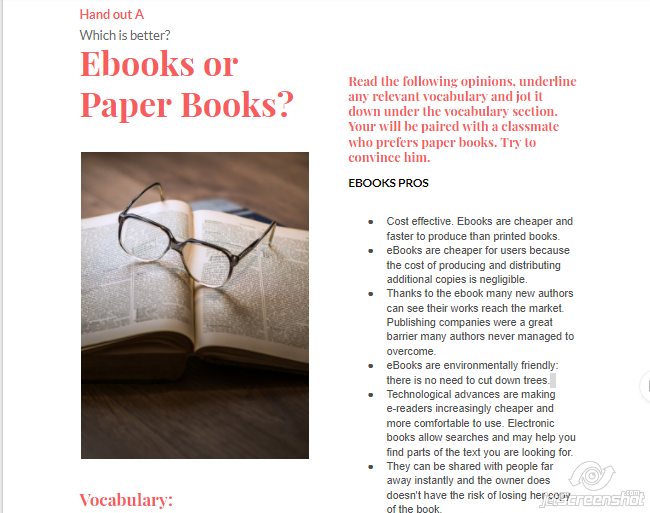
Topic:  Ebooks versus paper Books

Level: B2 (upper-intermediate)

Time: about 30 minutes

  • Step 1.  Brainstorming vocabulary.  As usual, we brainstorm vocabulary on the board. This is a necessary step as you don’t want students to get stuck because they can’t come up with a term.
  • Step 2. Posing the question.  I write on the board ht e big question. In this case: What do you prefer? Ebooks or paper books?
  • Step 3. Using the two-corner teaching technique.  This technique is actually called the four- corner technique, but I find a two-corner approach suits my classes better. With this technique, you get your students out of their seats and thinking about the topic they are going to discuss. In one corner of the classroom, I put up a notice saying paper books and in another corner a notice with ebooks written on it.

I ask students, still in their seats, to think which corner of the room they would choose and think of the reasons why they prefer one choice to another. After a bit of thinking time, I ask them to stand up and go to their corner of the room. Once there, they talk to the members of their group sharing ideas and talking about why they favour one choice and not the other.

  • Step 4.  Getting ideas from other sources.

Time to see how others express your same idea and maybe get some others. Give students in favour of ebooks handout A and give handout B to students who prefer paper books. Let them read it and comment it in their groups.

  • Step 5. Persuading and Convincing

This is the part I like best. Pair up students from both corners. Their aim will be to campaign on behalf of their choice and try to convince a student from the opposite corner to flip sides.

For this activity, I have used the website https://netivist.org/ , which is a platform where users can debate and engage in thoughtful discussion sharing different points of view.

Other  similar websites  are:

https://www.kialo.com/

https://debatewise.org/

Going the extra mile?

  1. Students practise talking about what these two sets of pictures suggest to them

2. Students listen to what other people have to say on the subject.

If you have missed Part 1 of how I prepare my students to take oral exams, you can read it here

Step by Step: How I train my students to pass Part 2 (the pictures) of the standardized speaking exams. Part 1.

Alright, alright!

I know this is the third time I’ve posted this week. It seems I’m full of energy after the Christmas break. I really needed that break, didn’t you? Anyway, happy to go back to teaching, but hanging ominously over my head like a black cloud about to burst is the pressing necessity to start training my students to take their standardized speaking exams which will allow them to promote to the C1 (advanced level).
For those of you who are not familiar with the exam, let me explain how it goes. You might find you can apply it to your own classes, even though it’s not exactly the same kind of exam.

There are two tasks in the speaking exam.

  • Part 1: examiner-led conversation. The examiner asks questions about a topic and the students give full answers.
  • Part 2: the monologue, where the students are given a set of pictures (normally two or three).

About Part 2

In this second part, the one this whole post is built upon, the student is offered two or three colour photographs. Normally, the photos are in contrast or represent different options of the same issue.  Also, there is a title or a statement which suggests the topic of the monologue. After some thinking time, normally a couple of minutes, the student is given the opportunity to speak for about 4-5 minutes without interruption.

At this level, students are expected to talk about the topic using a wide range of vocabulary and grammar structures and they will have to compare and contrast the pictures talking about the most important issues related to the topic.

Students face different fears when preparing for the oral exams. Some of them are:

  • Do I know enough specific vocabulary?
  • Will I be able to use a variety of structures or will I stick to the simple subj+verb+complement structure?
  • Now,  the topic is “food”?  3 or 4 minutes talking about food? Seriously?  For heaven’s sake, I cannot even talk for one minute, let alone three or four!

Vocabulary and ideas. Keywords here.

How I train my students. Topic: Food

This is how I help them step by step. Bear in mind this is the first post of a series of posts dedicated to training students to pass the oral exam. As students gain confidence, guidance will be less necessary and some of these steps will be either unnecessary or done by students as part of their learning process.


1. Brainstorming vocabulary. Learning progresses through prior knowledge, so tapping into students’ prior knowledge is an essential part of learning.

On the board, we brainstorm the vocabulary they already know. This is an important step because it helps students reinforce and bring to life the vocabulary studied in previous courses.

Then, I ask them some very simple questions where they can activate this vocabulary: What’s your favourite food? What is the most expensive restaurant that you have ever been to? What did you eat there?


2.Acquiring new vocabulary. We work on new vocabulary using a number of written and oral exercises. (Any good course book provides enough vocabulary input, at least to get started). It’s important to emphasize here the importance of learning words in chunks. Surely, you can teach the word “ obesity” on its own, but there some other words you really want to teach in collocations like, for example, “eating disorders” or to “be obsessed with”. Also important, essential I should say, is pronunciation.


3.  Getting Ideas. Reading and Speaking. More often than not students find it hard to think on their feet. They find it difficult to come up with ideas that will fill in the 3 or 4 minutes allowed for this part.

You might disagree with me here, but I always tell them that oral exams are like the rest of the exams they might take. They need to prepare. They need to study.

Lack of preparation might result in something I’ve seen very often when assessing oral exams; students might talk for one minute and then, suddenly, stop. Now, you might wait patiently for them to come up with something else but the truth is that very often, when prompted to continue, they just repeat the same ideas they have already used. Why? most of the times due to lack of preparation. They mistakenly think that they don’t need to study for oral exams. They do.

So, listen up dear students! You need to study for oral exams.


Reading about different issues related to the topic not only reinforces the vocabulary they have learnt and gives them a chance to see it used in context but also gives them ideas of what they can talk about when doing the real task.

I normally use short extracts from The Pais in EnglishHere’s my choice of extracts for the topic of food. This how we do it:

  • We read the extracts in class or set the reading task as homework.
  • We underline relevant vocabulary.
  • Students discuss the questions in pairs, followed by class discussion.


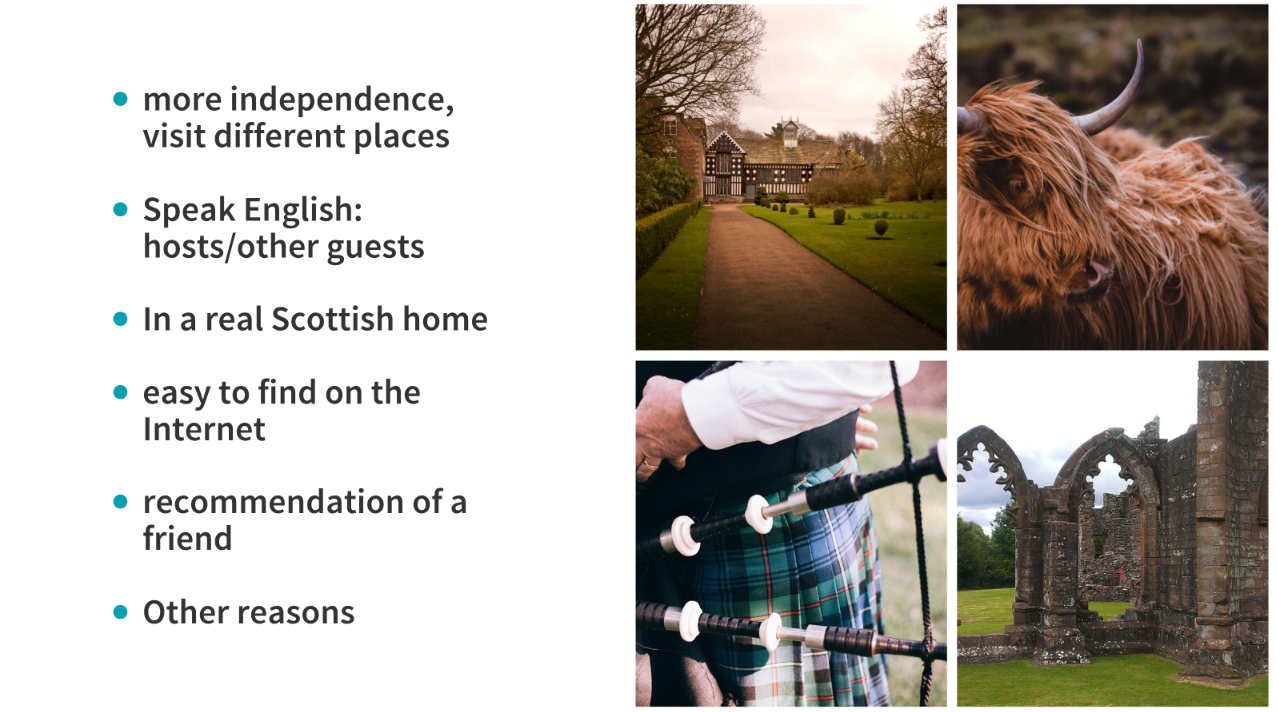
4. The pictures. I am lucky to have a computer and an overhead projector in my class, so I normally display a collage with two or three related pictures on the board. You can see the ones I have used for this topic here and here.

Together we read the title and brainstorm ideas to fill in these 3 or 4 minutes. This step should be easy now as we have previously discussed some ideas in the previous task. Some ideas could be:

Together, we brainstorm vocabulary

  • Pesticides
  • Label
  • To be obsessed with
  • Bulimia
  • Fats
  • Proteins
  • Carbs
  • …etc

  1. Tips.
  • Look at the pictures and the title if there is one. It will hint at what you need to talk about.
  • If you are given some thinking time, use it.
  • Remember that you are not asked to describe in detail what you can see in the pictures. You are asked to compare and contrast the pictures talking about the topic.
  • Focus on three or four ideas and develop them as much as you can without repeating yourself. Start with a short introduction about the topic, talk about the first idea, develop it; start with the second idea and repeat procedure.
  • Don’t forget to use specific vocabulary and a variety of structures.
  • Essential: practise a lot and record yourself taking the exam.

6. Homework. Further practice. Collaboratively writing on a Padlet.

This follow-up task has two main aims:

  • to reinforce acquired knowledge and strategies
  • to share ideas. By asking students to write on a  collaborative Padlet, they benefit from each other and see other ideas which might help them improve their own performance.
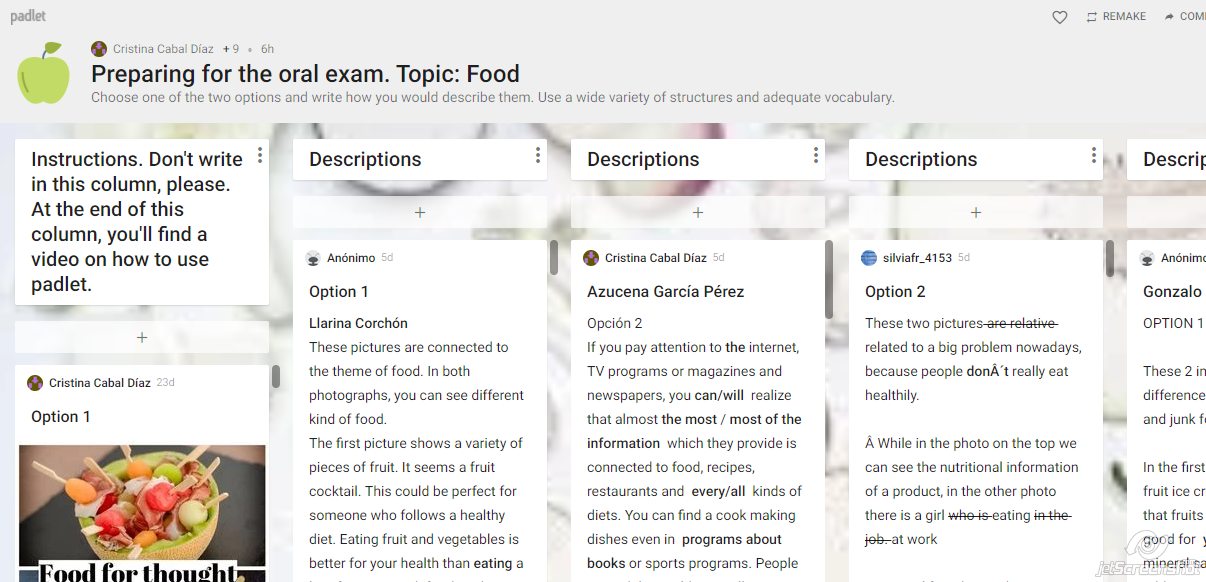
All the Padlets created for this purpose will then be shared in a single one where students, at a glance, can decide what topic to revise.

In the next post, we will move from writing to speaking on a Padlet.

Blog de Cristina is also on Facebook. Follow us

10 Best Free Listening Websites with Quizzes to Practise for Listening Exams

So what do you do to practise listening for exams?

Growing up, I never had the opportunity to do any extra practice to improve my listening skills. We didn’t have the Internet and the thousand possibilities it offers to learners of any language nowadays. The teachers had an old tape player that sometimes stopped and started on its own and old tapes that ended up sounding distorted and most of the times unlistenable so if you wanted to get better at listening, you just listened to the radio and struggled to understand the lyrics and sing along. Not that I ever complained. That was the perfect excuse to listen to music while claiming to be working hard. I have to say that my father never bought it!

So, exams are just around the corner and I know you’re beginning to freak out. Don’t worry! Here I am, coming to the rescue!

These are, in my opinion, the best sites with quizzes to practise listening comprehension. In no particular order.


TALK ENGLISH


  • url: http://www.talkenglish.com/
  • Levels: three main levels (beginner, intermediate and advanced)
  • Pre-listening /Post-listening activities: no
  • Transcript: yes
  • Audio Download: no
  • What I like best: it has some other listening activities like dictations or listening based on pictures for lower levels. It also has a section dedicated to advanced students with a story and some comprehension questions. See here
  • What I don’t like: In my opinion, the “listening” categorised under “advanced level” is far too easy.

 ELLLO


  • url: http://www.elllo.org/
  • Levels: six levels (beginners-advanced)
  • Pre-listening /Post-listening activities: grammar or vocabulary activities
  • Transcript: yes
  • Audio Download: only audio for vocabulary
  • What I like best: there are seven activity types (see them here) and a variety of accents.
  • What I don’t like: a bit disorganised.

ESL LOUNGE


  • url: http://www.esl-lounge.com/student/listening.php
  • Levels: four  (elementary, pre-intermediate, intermediate and advanced)
  • Pre-listening /Post-listening activities: no
  • Transcript: yes
  • Audio Download: yes
  • What I like best: it offers different kinds of comprehension exercises (multiple choice, cloze, true/false…etc)

BRITISH COUNCIL


  • url: http://learnenglishteens.britishcouncil.org/skills/listening-skills-practice
  • Levels: five levels ( A1, A2, B1, B2, C1)
  • Pre-listening /Post-listening activities: both
  • Transcript: yes
  • Audio Download: yes
  • What I like best: very user-friendly for both students and teachers. PDF available for exercises, answers and transcript.
  • Extra: The British Council also runs some other sections to improve and practise your listening skills and learn about Britain, its culture, its language and its people. See here

 EDTED LESSONS WORTH SHARING


  • url: http://ed.ted.com/lessons
  • Levels: advanced
  • Pre-listening /Post-listening activities: all the lessons have three parts : watch, think (where you can do the comprehension exercise) and discuss (post-listening questions)
  • Transcript: no, although most lessons are on youtube, and you can watch them with subtitles
  • Audio Download: the videos are on youtube, so they can be easily downloaded
  • What I don’t like: the audio is not sorted by level and although most of videos are for advanced students, some of them are much easier than others so I would say that they are suitable for B2 students and higher. You need to register although it’s free.
  • Extra: you can also create your own lessons

ESOL COURSES


  • url: http://www.esolcourses.com/content/topicsmenu/listening.html
  • Levels: four main levels (upper elementary, pre-intermediate, intermediate, upper-intermediate)
  • Pre-listening /Post-listening activities: most of the times
  • Transcript: no
  • Audio Download: the videos are on youtube, so they can be easily downloaded
  • What I like best: carefully designed  user-friendly lessons plans

ESL VIDEO


  • url: http://www.eslvideo.com/index.php
  • Levels: five ( from beginner to advanced)
  • Pre-listening /Post-listening activities: no
  • Transcript: not always
  • Audio Download: the videos are on youtube, so they can be easily downloaded
  • What I don’t like: anybody can create a listening quiz so it might contain mistakes
  • Extra: You can create your own quiz


BREAKING NEWS ENGLISH


  • url: http://www.breakingnewsenglish.com/index.html
  • Levels: seven levels
  • Pre-listening /Post-listening activities: both
  • Transcript: yes
  • Audio Download: yes
  • What I like best: you can listen to the same piece of news at different levels and the news can be read at different speeds.
  • Extra: Sean Banville’s also runs eight other sites, check them out here


RANDALL’S ESL CYBER LISTENING LAB


  • url : http://www.esl-lab.com/
  • Levels: three levels ( easy, medium and difficult)
  • Pre-listening /Post-listening activities: Both
  • Transcript: yes
  • Audio Download: No
  • What I like best: the post-listening activities and the vocabulary section ( see here) where you can learn how to pronounce words associated to different topics.

LYRICS TRAINING


  • url: https://lyricstraining.com/
  • Levels: four ( from beginner to expert)
  • Pre-listening /Post-listening activities: no
  • Transcript: any lyrics site will have the lyrics for the song
  • Audio Download: the videos are on youtube, so they can be easily downloaded
  • What I like: it’s fun and a different way to approach listening exercises.
  • Extra: You can create your own exercises (beta).

Check also:

Blog de Cristina is also on Facebook. Click to follow


Oral Exam: Monologue Based on One or More Pictures. Some Tips and Ideas to Get Started

In the intermediate and more advanced exam you will be presented with one, two or more pictures about the same topic but in clear contrast. It’s important to remember that you are not supposed to give a detailed description of everything that is happening in the picture(s). On the contrary, what is important is that you talk about the topic or idea suggested in the picture(s). If you are given  for example 3 minutes to talk, use just one minute of this time to describe in general, using appropriate language and structures; the rest of the time should be dedicated to talking about the topic and giving your opinion.

BEFORE THE EXAM

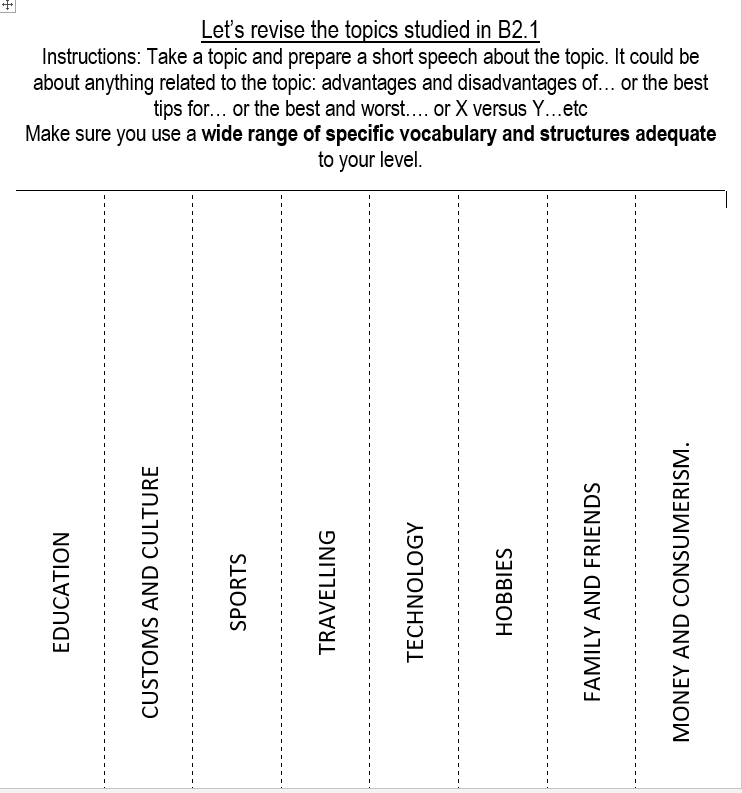
  • Make a list of the most common topics asked in the exam.
  • Brainstorm vocabulary you can use related to this topic. Mind mapping works perfect here. I use the free site Goconqr.

Mapa Mental creado con GoConqr por Cristina Cabal

  • Practise using sets of pictures in contrast. You can use my own selection here. (Scroll down)
  • If your problem is that you never know what to say, I suggest you have a look at some conversation questions you might be asked about the given topic. It will probably help you get started. Have a look at some common topics with questions here.
  • Listen to other students taking the exam (for example here) or read some examples here (fashion, global warming, jobs, new technologies and food)
  • Time yourself to control the time it takes you to develop your ideas.
  • Record yourself and then listen to the recording and see how you can improve it. You can use the app Soundcloud, which allows you to stop the recording and write comments.

(You can write a comment on a track through the text box below the waveform that says ‘Write a comment…’ and press your return or enter key to send. The comment will appear at the point on the waveform where you first started typing. Alternatively, you can click any free space in the comment section to leave a comment at that specific point)

  • The day before the exam, revise all the topics and the vocabulary you can use.
  • Half an hour before the exam, don’t speak your mother tongue. Spend the time listening, doing some silent reading or pronunciation exercises in English.

DURING THE EXAM

Before you start speaking:

  • If you are allowed 1 minute to organise your ideas, use that minute. I have often seen candidates not taking this minute and making a mess of the exam just because they didn’t take the time to organise their ideas.
  • Scan the pictures and identify the topic. Sometimes there is a title or a heading that helps you.
  • Try to come up with three ideas about the topic suggested by the pictures. Expand on these ideas.

Taking the exam:

  • Begin by giving an overall idea of what the pictures are about, using a variety of structures, modals to indicate possibility and the useful “look” or “seem”.
  • Talk about the topic. It’s easier if you relate it to yourself, but if you don’t have this experience, talk about a friend’s or just lie. This is an English exam, not a lie detector.

via GIPHY


  • Develop your ideas. Try to use linkers to connect your ideas.
  • Don’t give too complicated explanations. I’m sorry to say, you’ll probably make mistakes.
  • Give your opinion. Say which one you prefer and why.

Some expressions you can use:

Remember it’s better if you start by giving a general idea of what the pictures are about.  Don’t start like this:

In the first picture I can see

Start like this:

  • In this worksheet there are two photos. They both show different ways of (shopping).
  • These photos are clearly both connected to the topic of (science)… but in two quite different contexts. In the first one… In contrast, the second picture shows…
  • The photo/picture shows …
  • The first thing that strikes me about this picture is…


Remember that you are describing a picture, so you cannot be 100% sure of what is happening. Use language that suggests this:

  •  I think…
  • Maybe / Perhaps…
  • I guess they are…
  •  Modal verbs of deduction: she must / can’t /
  • Modal verbs of possibility: could, may, might
  •  She looks/seems… (tired)/ She looks like … (a teacher). It looks/seems as if (it’s raining)

PRACTICE.

Go to https://www.cristinacabal.com/?page_id=4906  and scroll down to the section SET OF PICTURES FOR PRACTICE and just “practise”. “A  lot!” 🙂


The Writing Process and 13 Tips to Raise your Essay Score

Writing is a process. For some students it might seem like a daunting task, but if you look at it as a succession of small steps to follow instead of looking at it as the big final product, writing can be fun and easy.

Useful Links:


Part 1. The Writing Process


Brainstorm for ideas

  • Write down all the ideas you can think of. You can try mind mapping your ideas. It is a good technique to generate ideas and expand on them. You can begin by writing a big bubble in the middle of the page with the topic and then use arrows to draw new bubbles with ideas and again arrows with more specific points or observations about this idea.
  • At this stage, don’t worry about spelling or grammar mistakes.

Organise your ideas

  • Decide which ideas to keep.
  • Group similar ideas together.
  • Organise your ideas according to the writing task.

Focus on language 

  • Think of words and expressions you will need in your work.

Write a draft

  • Write quickly. Don’t worry about things such as accuracy or neatness.
  • Use a pencil so that it is easier to make corrections and erase things.
  • If you are writing your draft by hand, leave a wide margin for notes and space between the lines for additions and corrections.
  • If you can’t think of a word in English, write it in your own language. You can look it up in a dictionary later.
  • If you don’t know the spelling of a word, write it anyway you can. You can look it up in a dictionary later.

Improve your draft

  • Do it slowly and conscientiously.
  • Check spellings in the dictionary and look up any word you felt unsure of. Here’s a very useful post Six Amazing Websites that Make your Writing Stronger.
  • Use a checklist to improve your work. See the one my students use here.
  • Read your draft aloud. Circle the things that need to be improved, reworded or clarified.
  • Take a break from writing and reread your draft after 30 minutes. Does everything sound right?

Write a final draft

  • Copy your corrected work neatly on a clean sheet of paper.
  • Make sure your paragraphs are clearly indicated.

Adapted from Burlington Books


 Part 2. Writing an Essay


An essay consists of several paragraphs about a topic. Although there are many different kinds of essays, they all have the same basic structure.

Opening

It is the general presentation of the topic. Try to get the reader interested in your essay. How can you do that? For example, by beginning

  • With a surprising fact.

Humans usually imitate the speech of someone with a strong accent due to empathy and to create a bond and assimilate with them.

  • With a short anecdote.

If you could interview anybody in the world, who would you choose?” asked the teacher. “Nelson Mandela”, I replied.

  • With a question.

Did you know that there is an island in Japan that has more than 450 people living above the age of 100?

 The Body.

The body can have one or more paragraphs which develop the topic. The first paragraph should contain the strongest argument or example. The second paragraph the second strongest argument and the third the weakest.

A paragraph consists of several sentences about a certain topic. It has the following parts:

  • A topic sentence, i.e. an idea.
  • One or several supporting sentences to expand on the idea.
  • A concluding sentence.

The parts should flow logically and the ideas should be easy to understand.

  • Go from general to specific. Give a general idea and then expand it.
  • Avoid unnecessary repetition by using pronouns to refer back to nouns already mentioned.
  • Use connector to join sentences and show the connection between ideas.

 The Closing

It is the paragraph that summarizes the main idea or presents a conclusion, depending on the kind of essay you need to write. Some things to bear in mind:

  • It should not bring new ideas.
  • It shouldn’t be very long.
  • It can be similar to the opening, but presented in different words.


13 Tips to Raise your Essay Score


  1. Read the assignment thoroughly, several times if necessary and underline anything relevant. Sometimes there is a question or several. Make sure you cover all of them. Focus on the purpose of the composition, on the tone and the style required and also on the length requirements.
  1. Plan your writing. You need to dedicate several minutes to planning what you are going to say and how you are going to say. It makes a big difference.
  1. Write a first draft. Use pencil, if possible, to erase or correct errors.
  1. Begin each paragraph with a topic sentence and then write some supporting sentences about this topic sentence. 1 idea= 1 paragraph.
  1. Use a variety of vocabulary and grammar structures. Avoid repeating the same words over and over again. Use synonyms or paraphrase. A thesaurus or a lexicon is useful as a source of alternative words. Use a range of grammar, sentence structure should be varied and clear.
  1. Use connectors to join ideas. They also play an important part in stringing together sentences and paragraphs.
  1. Time management. Organize the time you are given to write the essay. If you have one hour to complete the task, dedicate 10 minutes to planning and organizing your ideas and allow about 10 minutes at the end to proofread your essay before giving it to the teacher. You will still have 40 minutes left to write and develop your ideas.
  1. Keep to the topic. Don’t write about things that have nothing to do with the assignment.
  1. Sound natural. Just because you know lots of connectors, it doesn’t mean you have to use all of them.
  1. Punctuation. Pay attention to punctuation, especially to the correct use of commas and periods. Your text can be confusing if you don’t use them adequately.
  1. Style. Think about the purpose of the assignment and the audience it addresses and use the correct style and tone. If it’s informal, you can use colloquial language, simple and shorter sentences, contractions, abbreviations and emotional language. On the contrary if it’s a formal assignment, you will need to use more complex sentences, avoid contractions and abbreviations and you should definitely avoid emotional language or colloquial expressions.
  1. Proofread your essay. Have a coffee or go for a walk. Come back, take your essay and reread it aloud. Does it sound “right”? Then, it’s ready!
  1. Read a lot and try to write about anything for 30 minutes every day. You’ll soon get better.

Thanks for reading!

Blog de Cristina is also on Facebook. Follow us